In a home automation installation, we often need at the local level a set including sensors such as:
- a presence detector,
- a measurement of brightness
- a temperature measurement
A relay as actuator
A microcontroller for processing
There are many relays on the market that can be controlled with their proprietary software, but it is difficult to add a sensor or sensor.
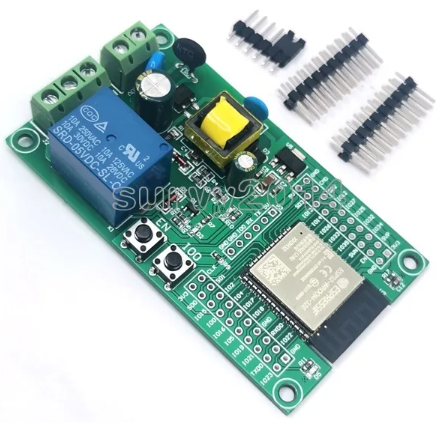
The modules presented here brings together an ESP32, 1 or 4 relays, and a power supply on the same board.
We find them at Aliexpress :
Benefits
- ESP32 grouping, relay and power supply. This simplifies the wiring
- Plate mounting holes
- GPIO or IO inputs/outputs to be wired below or above, which is very practical
- Numerous GND, 5V and 3.3V pins to connect sensors
Drawbacks
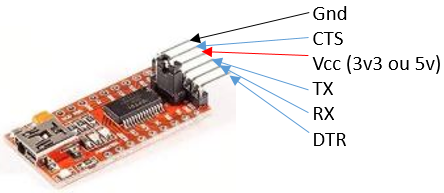
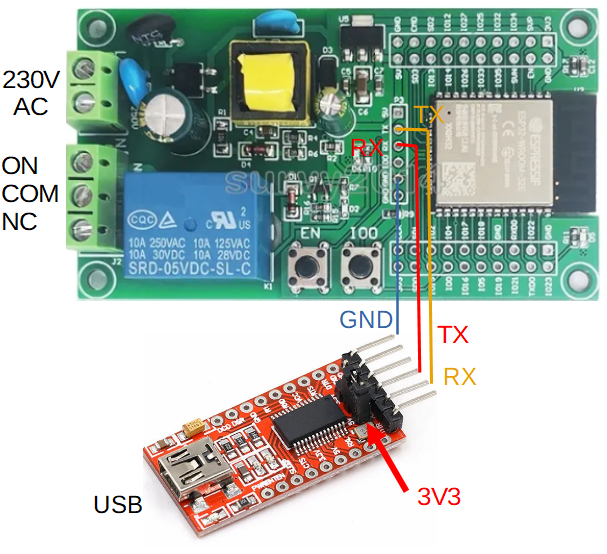
- No USB access for first programming. A USB/TTL interface is required
Hardware (1 relay board)
One power supply 230V AC
4 connectors * 10 pins
| 3V3 | CLK | 5V | GND |
| SD0 | SD1 | SD3 | CMD |
| IO15 | IO2 | IO13 | SD2 |
| IO0 | IO4 | IO14 | IO12 |
| IO16 | IO17 | IO26 | IO27 |
| IO5 | IO18 | IO33 | IO25 |
| IO19 | GND | IO35 | IO32 |
| IO21 | RXD0 | SVN | IO34 |
| TXD0 | IO22 | EN | SVP |
| IO23 | GND | GND | 3V3 |
Programming Connector
| IO0 | GND | GND | RX | TX | 5V |
Others
| Rely | IO16 |
| LED blue | IO23 |
| Button EN (Reset) | EN |
| Button IO0 | IO0 |
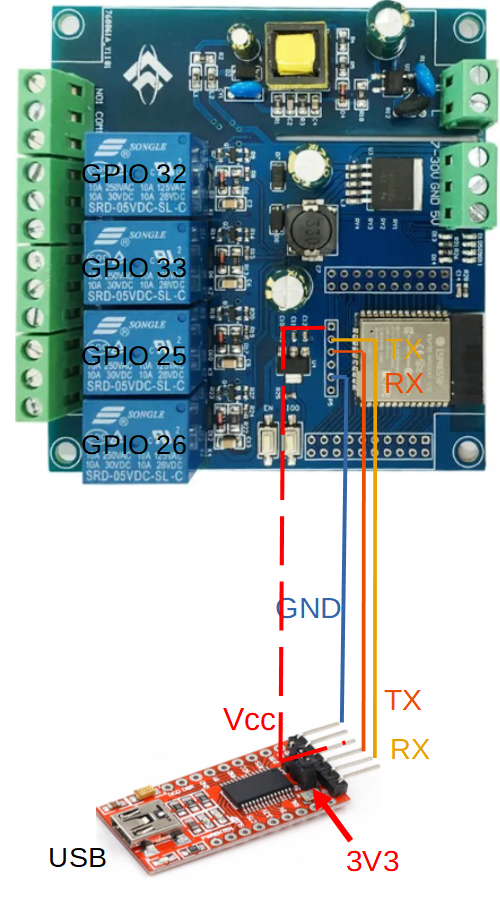
Hardware (4 relays board)
3 possible power supply inputs :
- 230V AC
- 7V à 30V DC
- 5V DC
4 connectors * 10 pins
| 3V3 | CLK | 5V | GND |
| SD0 | SD1 | SD3 | CMD |
| G15 | G2 | G13 | SD2 |
| G0 | G4 | G14 | G12 |
| G16 | G17 | G26 (relay) | G27 |
| G5 | G18 | G33 (relay) | G25 (relay) |
| G19 | GND | G35 | G32 (relay) |
| G21 | RXD | SVN | G34 |
| TXD0 | G22 | EN | SVP |
| G23 (LED ) | GND | GND | 3V3 |
Programming Connector
| IO0 | GND | GND | RX | TX | 5V |
Others
| Button EN (Reset) | EN |
| Button IO0 | IO0 |
Programming
To download code, you need to connect a USB / TTL interface with the power strap on 3V3.
For powering the ESP32 card during programming, we have 2 choices:
- power through the serial adapter VCC output to the 5V of the ESP card (will only work for programming)
- supply the ESP32 with 230V and no serial link VCC output to ESP32 card
To start programming, you must:
- keep the IO0 button pressed
- press EN (Reset)
- release the 2 buttons
So the ESP waits for programming. After programming push again the EN button to reset and starts the new program.
Software
This module has the advantage of not being proprietary, you can put whatever you want there.
Arduino
With the Arduino IDE tool, you can develop your own code. Choose the ESP32 DEV module board. Details on getting started can be found here: https://f1atb.fr/programming-the-esp32-application-to-the-photovoltaic-router/
With the Arduino, integrate OTA mode into your code allowing you to update the code remotely via WIFI. So you will no longer need the USB/TTL interface
ESP Easy
Firmware allowing you to program ESP8266 or ESP32 and having the code for many sensors on the market. This simplifies programming
https://espeasy.readthedocs.io/en/latest/index.html
ESPHome
Powerful firmware allowing you to program your ESP32 with simple descriptions of interfaces, actions, events etc in a yaml file. Often associated with the Home Assistant home automation system.
https://esphome.io/index.html
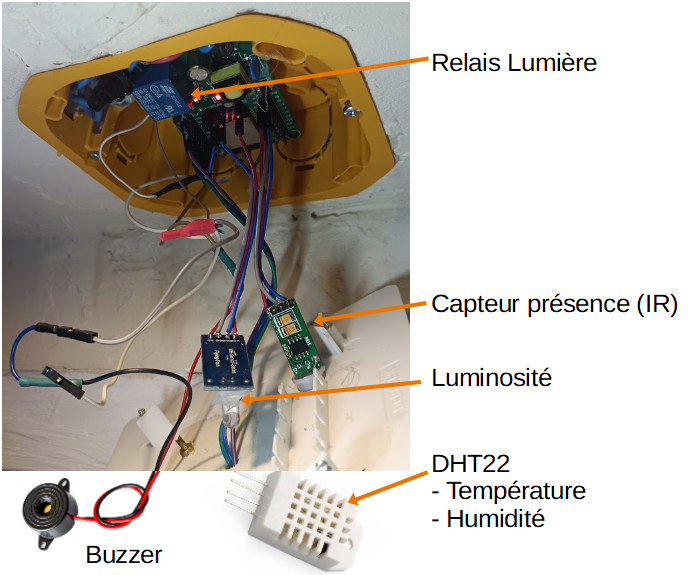
Example of construction
Here an example grouping :
- IR sensor
- Luminosity sensor
- Sensor (DHT22) for temperature and humidity
- Buzzer as bell
- Interface to an On/Off switch
- Relay connected to the light
Hello,
thanks for your blog. Restarting the board results in switching the relay. Do you have this too? Thanks!
I don’t know. This is the boot sequence. Difficult to control.