100% software installation without hardware intervention

The SonOff mini is a very useful module in home automation. It has many interesting features like:
- a reduced size of 42*42*20mm allowing it to be housed inside wall switch boxes
- a relay to switch from 230v up to 10A
- an input allowing to receive a command like a switch
- a wifi connection allowing remote control
- a programmable microcontroller (ESP 8285 similar to 8266) to manage the logic of the whole
- a price below 10€
In a previous article, I described the installation of the ESP Easy firmware to customize its SonOff. This installation requiring soldering of pins can put off more than one. Here we use the Arduino IDE to develop our own code and download it in OTA (On The Air) mode via WiFi. This offers the possibility of controlling the SonOff relay from a home automation system (HA, Domoticz, etc.) or from a web page on your smartphone. This avoids going through proprietary smartphone applications that send your orders through a cloud located somewhere in the world.
Step 1 : Installation – SonOff DIY
Take the SonOff out of its box and plug it into 230V. We will use the so-called DIY mode (Do IT Yourself) of the SonOff to access the reprogramming of the firmware.
Once powered up, press the box switch for at least 5s (or even a second time for 5s if the system has already been programmed). The blue LED flashes quickly, the SonOff switches to Wifi transmission (Access Point “ITEAD….xxxxx”) connect with a smartphone with the password 12345678. If the connection is not done automatically, the IP address to enter in your browser is http://10.10.7.1/. Then fill in the name of the local wifi to be used (SSID) in the future as well as the password of your network.
Download the “SonOff DIY Mode Tool“. Unzip the file and in the “tool” folder run the “tool_01DIY85(v3.3.0).exe” executable on a PC connected to the same network as your Wifi. In the meantime, find via your internet box or any other tool, the IP address that has been assigned to your SonOff-Mini. This tool will scan your network and find the SonOff.
The SonOff DIY Mode Tool for windows allows you to become familiar with the commands to pass (REST API) to the SonOff to control the relay from a home automation system, but you have no control over the firmware. On the other hand, there is at the top right a “Firmware Flash” or “Brush machine” button which allows you to upload a new firmware.

Step 2 : New Firmware Installation
As access to the ESP micro-controller can only be done via Wifi, it is necessary to install software that allows updates via WiFi called OTA (On The Air). For this, we use the Arduino IDE development tool.
Solution 1
The first possibility is to use an example provided in the IDE. Choose “ArduinoOTA/BasicOTA” program for ESP8266. This is the minimum required to be implemented in any program to be able to update it later. Remove all outputs on the unavailable serial port: Serial….

In the Arduino IDE, you have to choose the Generic ‘ESP8266 Module board. In the code, enter the SSID and the WiFi password. Above all, do not forget, because you will no longer be able to access the ESP unless you reprogram it using hardware.
This piece of code does nothing except install the minimum to do updates via WiFi.
To create the binary to ‘upload’ to the ESP, go to sketch, select ‘Export compiled binaries’. We find the binary in the source folder with a .bin extension
With the DIY Mode Tool, upload the binary file. Thereafter, the Arduino IDE recognizes your access to the board via Wifi, and you can ‘upload’ any application, but always include at least:
- #include <ArduinoOTA.h> , the OTA library
- ArduinoOTA.begin(); in the setup
- ArduinoOTA.handle(); in the loop
Solution 2
The second possibility is to implement the example downloadable here which allows to control the relay:
- from a webpage,
- remotely from a home automation application with an http command,
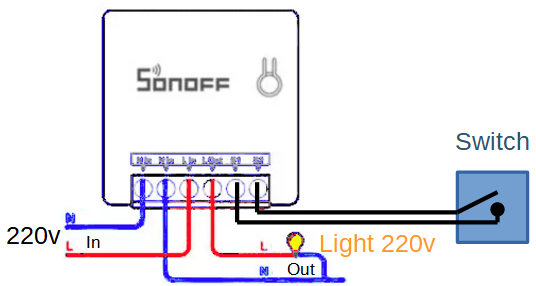
- by connecting a switch to the S1 and S2 inputs of the ESP Mini R2
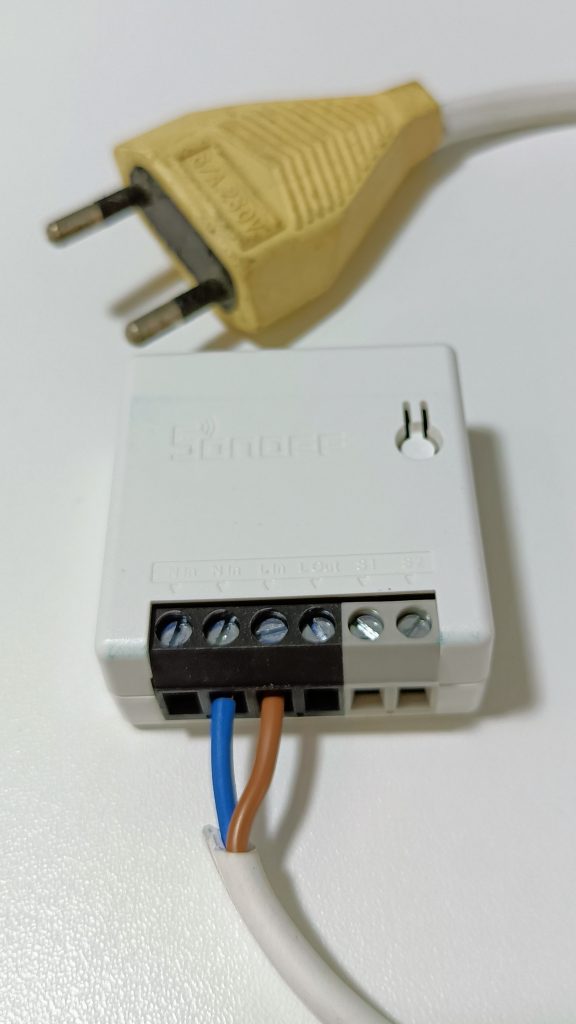
To create the binary to be ‘uploaded’ to the ESP, unzip the downloaded file which includes a folder with an .ino file and a .h file. Open the .ino source file in the Arduino IDE. Select the ‘Generic ESP 8266 module’ board, go to sketch, select ‘Export compiled binaries’. We find the binary in the source folder with a .bin extension
With the DIY Mode Tool, upload the binary file to the ESP.
At this point, the implanted program will run, but it does not know the name of the wifi to connect to. It will switch to Wifi mode: access point. Take your smartphone or a PC with a WiFi interface. Look for a network called: F1ATB-SonOff-…..
Connect to the network, there is no password.
Launch a browser at: http://192.168.4.1
The ESP will send you a page asking you for the name of the WIFI network on which it will have to connect in the future, as well as the password. These values are stored in the EEPROM memory of the ESP.
Connect with your smartphone or PC to this WIFI network and you will find the ESP there at the IP address assigned to it by your internet-box. If you do not know the IP address, look at your internet-box for the list of connected computers.
For safety, if the ESP in access point mode has no client after 3 minutes, it resets. If it is unable to connect afterwards, it switches back to access point mode for 3 minutes.
Remote Access Orders
The ESP is accessed by the ip address (ex: 192.168.1.10) or by http://hostname.local, an mDNS server being installed.
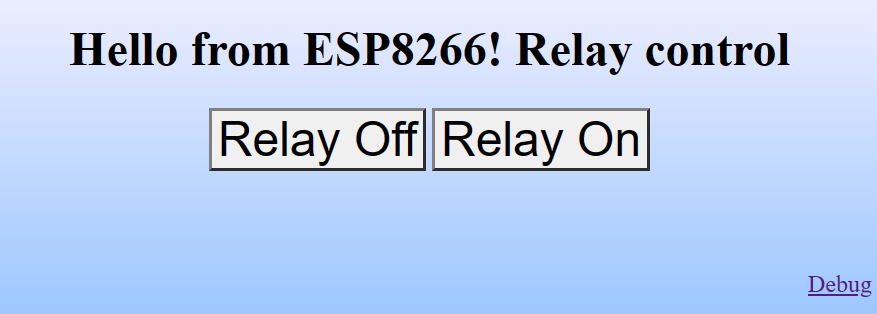
http://<ip> Acces to the main page to control the relay
http://<ip>/Relay?R=1 remote control, relay on
http://<ip>/Relay?R=0 remote control, relay off
http://<ip>/Debug Debug and history of commands received
Thereafter, all updates are done OTA by the Arduino IDE. You must select the card with the correct IP address. Above all, don’t forget the piece of code to access OTA:
- #include <ArduinoOTA.h> ,the OTA library
- ArduinoOTA.begin(); in the setup
- ArduinoOTA.handle(); in the loop
Bugs
The Arduino IDE will ask you for a password when compiling in OTA mode. Answer anything, 1 letter minimum.
Sometimes with the Arduino IDE at the end of the transfer, the icon remains yellow and you no longer have control. Close the IDE and relaunch it.
SonOff Mini Hardware
The GPIO4 pin and ground are available on the terminal block. For the other pins, open the SonOff to access them.
| GPIO0 | Switch | ESP Programming |
| GPIO1 | TX | |
| GPIO2 | ||
| GPIO3 | RX | |
| GPIO4 | S2 input | |
| GPIO12 | Relay | 1=”On”0=”Off” |
| GPIO13 | Blue LED | O=”Off” 1=”On” |
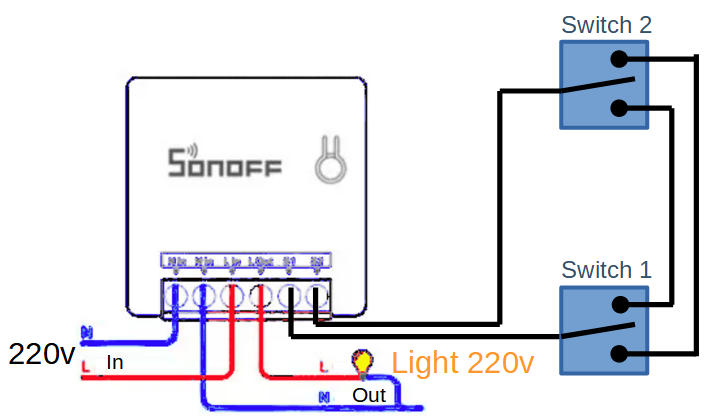
In addition to a command via the web, you can connect a switch which will change the state of the relay each time it is switched.
In a domestic installation, a back-and-forth system with 2 switches can be replaced by installing a SonOff which will take over the 2 existing switches. The connection being in low tension 3.3v, one can use wire of telephone to connect the switches between them.