The ESP32 is a very interesting microcontroller, because it combines analog and digital inputs and outputs as well as WIFI and Bluetooth access. Once set up for a given application, it may be necessary to modify its program. But if it is far or inaccessible from your PC used for programming, it is possible to modify it via Wifi. This technique is called OTA (Over The Air).
Choice of ESP32 board
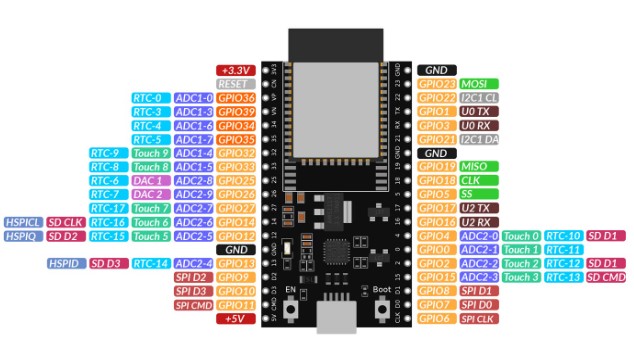
There are many boards on the market based on ESP32. It can sometimes be difficult to find the definition of the output pins (GPIO). Here we use an AZ-Delivery development board with an ESP32-Wroom and 2×19 pins. Can be purchased from Amazon.
Arduino IDE
Programming the board is done using the Arduino IDE development tool. It is necessary in the preferences to call on the card manager of “Espressif” which develops the ESP32. Go to File / Preferences and put the address: : https://dl.espressif.com/dl/package_esp32_index.json

In the boards manager, choose yours. In our case, it will be “ESP 32 Dev Module”.
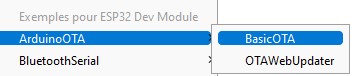
Basic OTA
In the examples, select the program “Basic OTA”.
We will slightly modify the proposed program to impose an IP address on the ESP32.
#include <WiFi.h>
#include <ESPmDNS.h>
#include <WiFiUdp.h>
#include <ArduinoOTA.h>

const char* ssid = "YOUR SSID";
const char* password = "THE PASSWORD";

// Set your Static IP address
IPAddress local_IP(192, 168, 0, 208); //HERE DEFINE YOUR IP ADRESS
// Set your Gateway IP address
IPAddress gateway(192, 168, 0, 254);  //DEFINE THE GATEWAY

IPAddress subnet(255, 255, 255, 0);
IPAddress primaryDNS(8, 8, 8, 8);   //optional
IPAddress secondaryDNS(8, 8, 4, 4); //optional


void setup() {
  Serial.begin(115200);
  Serial.println("Booting");


 // Configures static IP address
  if (!WiFi.config(local_IP, gateway, subnet, primaryDNS, secondaryDNS)) {
    Serial.println("STA Failed to configure");
  }
  WiFi.begin(ssid, password);
  while (WiFi.waitForConnectResult() != WL_CONNECTED) {
    Serial.println("Connection Failed! Rebooting...");
    delay(5000);
    ESP.restart();
  }


  ArduinoOTA
    .onStart([]() {
      String type;
      if (ArduinoOTA.getCommand() == U_FLASH)
        type = "sketch";
      else // U_SPIFFS
        type = "filesystem";

      // NOTE: if updating SPIFFS this would be the place to unmount SPIFFS using SPIFFS.end()
      Serial.println("Start updating " + type);
    })
    .onEnd([]() {
      Serial.println("nEnd");
    })
    .onProgress([](unsigned int progress, unsigned int total) {
      Serial.printf("Progress: %u%%r", (progress / (total / 100)));
    })
    .onError([](ota_error_t error) {
      Serial.printf("Error[%u]: ", error);
      if (error == OTA_AUTH_ERROR) Serial.println("Auth Failed");
      else if (error == OTA_BEGIN_ERROR) Serial.println("Begin Failed");
      else if (error == OTA_CONNECT_ERROR) Serial.println("Connect Failed");
      else if (error == OTA_RECEIVE_ERROR) Serial.println("Receive Failed");
      else if (error == OTA_END_ERROR) Serial.println("End Failed");
    });

  ArduinoOTA.begin();

  Serial.println("Ready");
  Serial.print("IP address: ");
  Serial.println(WiFi.localIP());
}

void loop() {
  ArduinoOTA.handle();
}
Adapt the code, “SSID of WIFI, Password and IP address.
Download this code via the serial link. On the monitor, you will find the IP address taken into account. Pressing the RST button allows you to properly test the assembly. At this point, you will be able to update the programming via the web by choosing not the serial port in the Arduino IDE, but the network port, in our case 192.168.0.208. In your code, you will have to integrate the ArduinoOTA part in order to keep this possibility.
Example with “Debug”
By going through Wifi you will lose the possibility of debugging through the serial port. The “RemoteDebug” library will allow us to find this possibility by listening Telnet on port 23. As an example, we will make a small web server on port 80.
#include <WiFi.h>
#include <ESPmDNS.h>
#include <WiFiUdp.h>
#include <WiFiClient.h>
#include <WebServer.h>
#include <ArduinoOTA.h>
#include <RemoteDebug.h>

const char* ssid = "Arthur";
const char* password = "4545454545";
RemoteDebug Debug;
unsigned long previousMillis;


// Set your Static IP address
IPAddress local_IP(192, 168, 0, 208);
// Set your Gateway IP address
IPAddress gateway(192, 168, 0, 254);

IPAddress subnet(255, 255, 255, 0);
IPAddress primaryDNS(8, 8, 8, 8);   //optional
IPAddress secondaryDNS(8, 8, 4, 4); //optional

WebServer server(80);


void handleRoot() {
  Debug.println(F("Client Web"));
  server.send(200, "text/plain", "Hello Client");

}

void handleNotFound() {
 Debug.println(F("File Not Found"));
  String message = "File Not Foundnn";
  message += "URI: ";
  message += server.uri();
  message += "nMethod: ";
  message += (server.method() == HTTP_GET) ? "GET" : "POST";
  message += "nArguments: ";
  message += server.args();
  message += "n";
  for (uint8_t i = 0; i < server.args(); i++) {
    message += " " + server.argName(i) + ": " + server.arg(i) + "n";
  }
  server.send(404, "text/plain", message);
}

void setup() {
 // Configures static IP address
  if (!WiFi.config(local_IP, gateway, subnet, primaryDNS, secondaryDNS)) {
    Debug.println("STA Failed to configure");
  }

 WiFi.begin(ssid, password);
 while (WiFi.waitForConnectResult() != WL_CONNECTED) {
   Debug.println("Connection Failed! Rebooting...");
   delay(5000);
   ESP.restart();
 }
 // init remote debug
 Debug.begin("ESP32");

 initOTA();
 Debug.println("Ready");
 Debug.print("IP address: ");
 Debug.println(WiFi.localIP());

server.on("/", handleRoot);

  server.on("/inline", []() {
    server.send(200, "text/plain", "this works as well");
  });

  server.onNotFound(handleNotFound);

  server.begin();
  Debug.println("HTTP server started");

}
void loop() {
 ArduinoOTA.handle();
 Debug.handle();
 server.handleClient();
 if (millis() - previousMillis >= 5000) {
   previousMillis = millis();
   Debug.println(F("Code has been update"));
 }
}
void initOTA() {
 // Port defaults to 3232
 // ArduinoOTA.setPort(3232);
 // Hostname defaults to esp3232-[MAC]
 ArduinoOTA.setHostname("ESP32");
 // No authentication by default
 // ArduinoOTA.setPassword("admin");
 // Password can be set with it's md5 value as well
 // MD5(admin) = 21232f297a57a5a743894a0e4a801fc3
 // ArduinoOTA.setPasswordHash("21232f297a57a5a743894a0e4a801fc3");
 ArduinoOTA
 .onStart([]() {
   String type;
   if (ArduinoOTA.getCommand() == U_FLASH)
     type = "sketch";
   else // U_SPIFFS
     type = "filesystem";
   // NOTE: if updating SPIFFS this would be the place to unmount SPIFFS using SPIFFS.end()
   Debug.println("Start updating " + type);
 })
 .onEnd([]() {
   Debug.println("nEnd");
 })
 .onProgress([](unsigned int progress, unsigned int total) {
   Debug.printf("Progress: %u%%r", (progress / (total / 100)));
 })
 .onError([](ota_error_t error) {
   Debug.printf("Error[%u]: ", error);
   if (error == OTA_AUTH_ERROR) Debug.println("Auth Failed");
   else if (error == OTA_BEGIN_ERROR) Debug.println("Begin Failed");
   else if (error == OTA_CONNECT_ERROR) Debug.println("Connect Failed");
   else if (error == OTA_RECEIVE_ERROR) Debug.println("Receive Failed");
   else if (error == OTA_END_ERROR) Debug.println("End Failed");
 });
 ArduinoOTA.begin();
}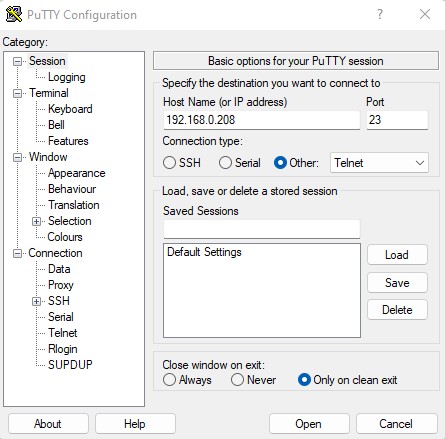
This time, download the code via Wifi network. In parallel, open a Telnet session with a program like Putty. Enter the ESP32 IP address and port 23. Open your web browser, and enter the ESP IP address.
You can now take inspiration from this example for your application to be updated via Wifi.