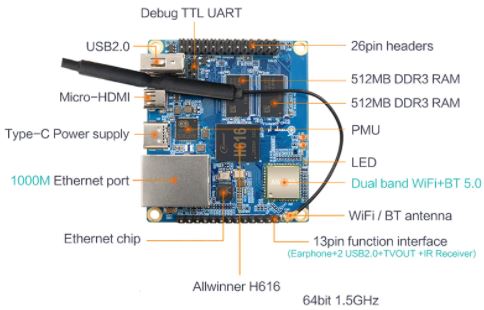
The Orange PI Zero 2 is a powerful development board offering many possibilities with its 64-bit 4-core processor (H616), 1GB, ethernet, WIFI, Bluetooth, HDMI, USB for around € 40. Take a look at aliexpress.com. Be careful not to confuse it with the Orange Pi Zero which uses an H3, 32-bit processor.
Operating System Installation
Go to the Armbian website to download the image of the “Bullseye” (today unstable) version for the Orange Pi Zero 2. Flash the image on an SD card of minimum 16GB. Connect the Orange Pi to the network and find its IP address. Connect in ssh (Bitwise software for example) with the user ‘root’ and the password ‘1234’.
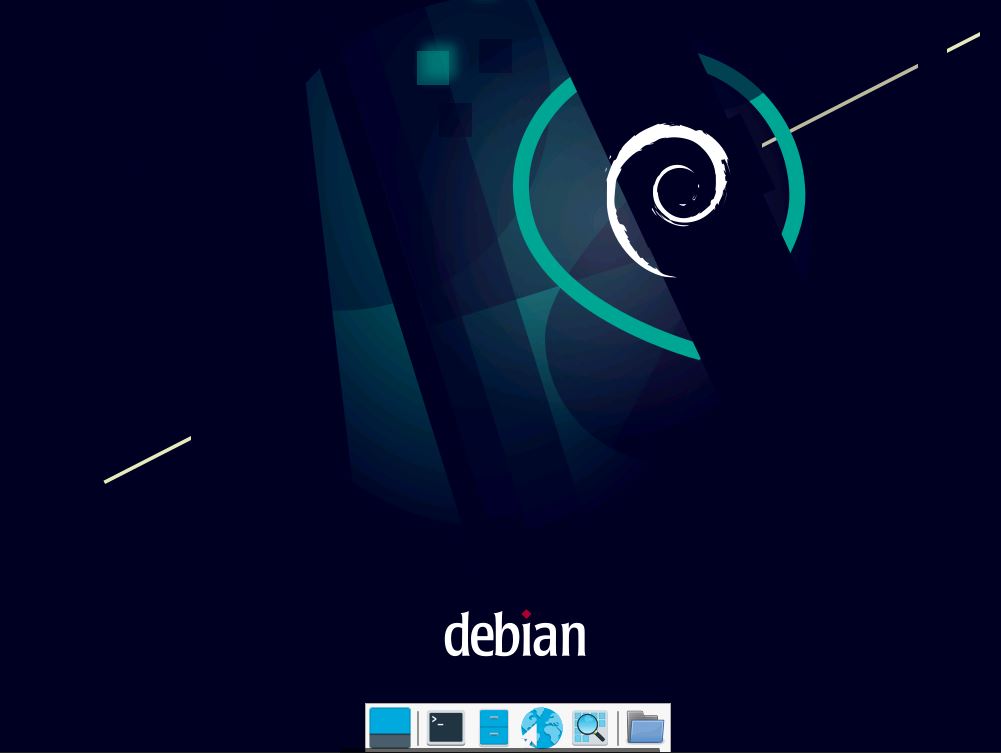
Activate the Desktop to be able to access in graphical mode. In a terminal window:
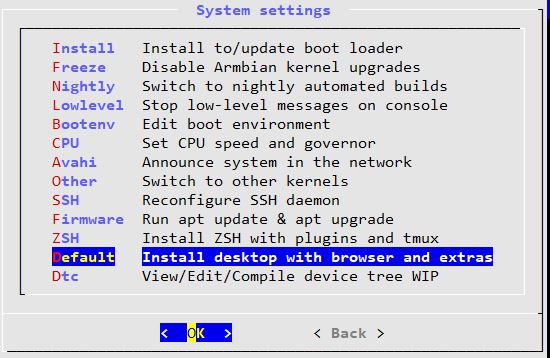
armbian-config
Install the Desktop. Once done, go back to the System menu and choose Enable Desktop
In the ‘Terminal’ window make the updates:
– apt-get update
– apt-get upgrade
Install TightVNC server to have remote graphical access via the VNC client extension of the Chrome browser or TightVNC for Windows.
apt-get install tightvncserver
Stay as root user.
Start VNC in manual mode:
vncserver :1
You will be asked for a password. Do not put more than 8 characters. You can now test VNC with for example the chrome VNC extension by connecting to ‘orangepi_ip_address: 5901’.
For an automated launch we will create a script file:
nano /usr/local/bin/my_vnc.sh
#!/bin/bash
PATH="$PATH:/usr/bin/"
DISPLAY="1"
DEPTH="16"
GEOMETRY="1920x1080"
OPTIONS="-depth ${DEPTH} -geometry ${GEOMETRY} :${DISPLAY}"
case "$1" in
start)
/usr/bin/vncserver ${OPTIONS}
;;
stop)
/usr/bin/vncserver -kill :${DISPLAY}
;;
restart)
$0 stop
$0 start
;;
esac
exit 0
Copy the text above and copy it into nano with a right click if you are using Bitwise SSH. Remember to make this file executable.
sudo chmod +x /usr/local/bin/my_vnc.sh
We can now perform the following 3 operations:
/usr/local/bin/my_vnc.sh start
/usr/local/bin/my_vnc.sh stop
/usr/local/bin/my_vnc.sh restart
For an automatic launch of VNC when booting the orange pi we create a service in ‘systemd’.
sudo nano /lib/systemd/system/my_vnc.service
[Unit]
 Description=Manage Mon Serveur VNC
 [Service]
 Type=forking
 ExecStart=/usr/local/bin/my_vnc.sh start
 ExecStop=/usr/local/bin/my_vnc.sh stop
 ExecReload=/usr/local/bin/my_vnc.sh restart
 User=root
 [Install]
 WantedBy=multi-user.target
For the inclusion of this new service in systemd.
systemctl daemon-reload
systemctl enable mon_vnc.service
Now you can reboot your system and verify with VNC the connection in graphical mode.
systemctl start mon_vnc.service
systemctl stop mon_vnc.service
systemctl restart mon_vnc.service
systemctl status mon_vnc.service
Now you have an OrangePi Zero 2 that can be controlled remotely from a PC on your network.
Samba Installation
To easily exchange files between the Orange Pi and a PC on the network, it is useful to install Samba which will allow you to view it directly.
Install Samba.
apt-get install samba samba-common-bin
You have to modify the configuration file to adapt it to the network and define the permissions.
nano /etc/samba/smb.conf
At the bottom of the file add the following lines:
[OpiZero2]
comment =  Samba on Orange Pi
path = /
writable = yes
guest ok = yes
guest only = yes
create mode = 0777
directory mode = 0777
share modes = yes
With path = / we directly access the root of the system to have the freedom to browse anywhere. Be careful to put, if necessary, the chmod permissions… which are fine.
Restart samba .
systemctl restart smbd.service
Now the Orange Pi should be visible to other PCs on the network. You can change your name on the network by typing in a terminal window:
hostnamectl set-hostname new-nom
Installing the Apache 2 web server
Apache2 is one of the world’s most widely used, robust and reliable web server applications. It runs perfectly on SBCs (Single-Board Computers) like the Orange Pi Zero 2.
Start with a system update:
apt-get update
apt-get upgrade
Proceed with the installation:
apt install apache2 -y
Test how Apache works by opening the web page to the IP address of your Orange PI
http://<adresse IP> ex: http://192.168.0.100
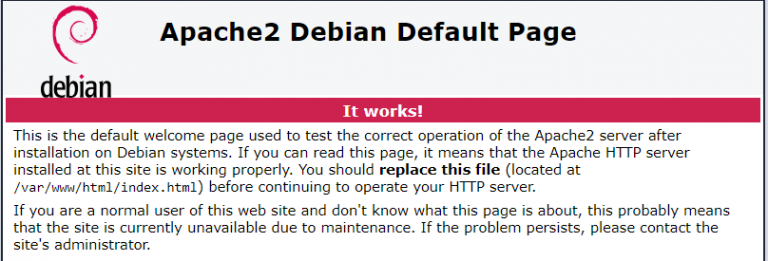
By default, the website is located in the / var / www / html / folder and Apache returns the /var/www/html/index.html file.
The Apache configuration file should be adapted, in particular if you want to put dynamic pages in the / var / www / html / cgi-bin folder.
nano /etc/apache2/sites-available/000-default.conf
<VirtualHost *:80>

	ServerName localhost

	ServerAdmin webmaster@localhost
	DocumentRoot /var/www/html

	ScriptAlias "/cgi-bin/" "/var/www/html/cgi-bin/"
	<Directory "/var/www/html/cgi-bin/">
                AllowOverride None
                Options +ExecCGI
                AddHandler cgi-script .cgi .pl .py
                Require all granted
        </Directory>

	ErrorLog ${APACHE_LOG_DIR}/error.log
	CustomLog ${APACHE_LOG_DIR}/access.log combined

</VirtualHost>
Activate the cgid module for dynamic pages by typing:
a2enmod cgid
then
systemctl restart apache2
DYNAMIC SCRIPTS TEST
Common Gateway Interface (CGI) defines a method of interaction between a web server and external content-generating programs, more often referred to as CGI programs or CGI scripts. This is an easy way to add dynamic content to your website using your favorite programming language like perl or python. Here only in the cgi-bin folder the programs will be executable as defined by the ScriptAlias directive of the Apache configuration file.
In the cgi-bin folder, put a small python ‘test.py’ file to test its execution. Make this file executable.
#!/usr/bin/python3

print("Content-type:text/html\n\n")
print("hello")
Call up the page from a browser.
http://<adresse IP>/cgi-bin/test.py
If you have a server error, check that your test.py page is written with a Unix-adapted LF end of line and not windows CR + LF.
Now you have a full operating system with a web server on port 80.
Hello Andre,
Nice software i installed it and works well in pluto or hackrf one.
But i have a problem here!!! i use a lnb and pluto thats is gpslocked but at 24 mhz, why then is my lo freq 9360.00 mhz and not 9750.00 mhz i can use the narrow band perfect and use in Horizontal mode 18v alo a sat tuner and have picture from the QO100 wide band on my 1.8 dish.
So Andre is there a way to set in the remote sdr soft the lo TO 9360.000 mhz pls and how ??? greetings the Alain ON7ATV
Alain
The parameter to specify the frequency shift is defined in the file “configurationRX.js”. You can see its content in the Tools page.
The variable is there: Offset.push([10000000000,11000000000,-9750000000]); //QO-100 Dish
You have to modify this file with a simple text editor. Some explanations are given here: https://f1atb.fr/index.php/2021/05/11/remote-sdr-v2-software-architecture/
73
F1ATB