A V2 version, with a Triac for precise overproduction injection is available here:
https://f1atb.fr/diy-solar-energy-router-to-manage-overproduction/
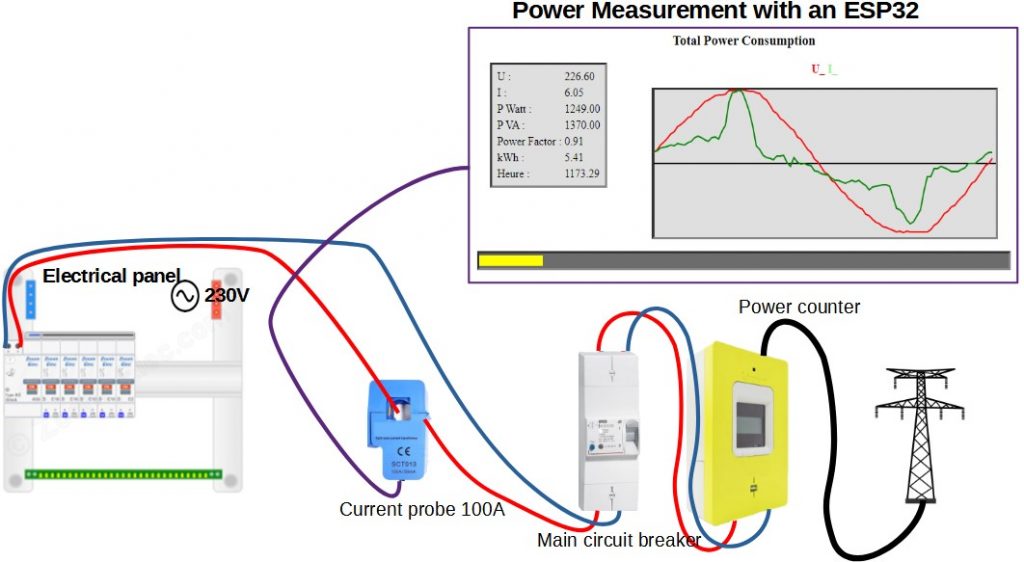
Measuring in real time the electrical power consumed or even produced by a solar installation allows for better management. For example, in the event of a surplus, in a self-consumption installation, hot water production can be started.
The assembly below:
- measures power
- provided the instantaneous voltage and current curve on a web page
- activates a relay in case of production above consumption
- provided a report to the central home automation system (Domoticz) for registration.
The ESP32 is a microcontroller adapted to our needs. It includes :
- analog inputs for measuring voltages,
- digital inputs/outputs to activate a relay if necessary,
- a WIFI connection for remote reporting on a web page or a home automation system.
Current Sensor
To measure the current, a current sensor is used through which the mains phase wire is passed. At the output, acting like a transformer, it provides an identical current, but 2000 times lower. This current is sent across a resistor and we will measure the voltage generated.
There are different models depending on the Max current that you want to measure. The 100A version is suitable for a home with a maximum power delivered of 12kVA. It is found in China at Aliexpress.
Voltage sensor
To measure the voltage, we use a classic wire-wound step-down transformer that isolates us from the mains. For example a 220v/6v. We need a model as small as possible, we do not take any power. It’s not very easy to find anymore. A so-called bell transformer can do the trick.
Current and Voltage Measurement
The measurement of the 2 voltages representing the current and the mains voltage is done by the analog inputs of the ESP32. These inputs accept a voltage between 0 and 3.3V and digitize the value on 12 bits, values between 0 and 4095. To adapt to the input dynamics, a voltage reference is created in the middle of the range at 1.65V = 3.3V/2.
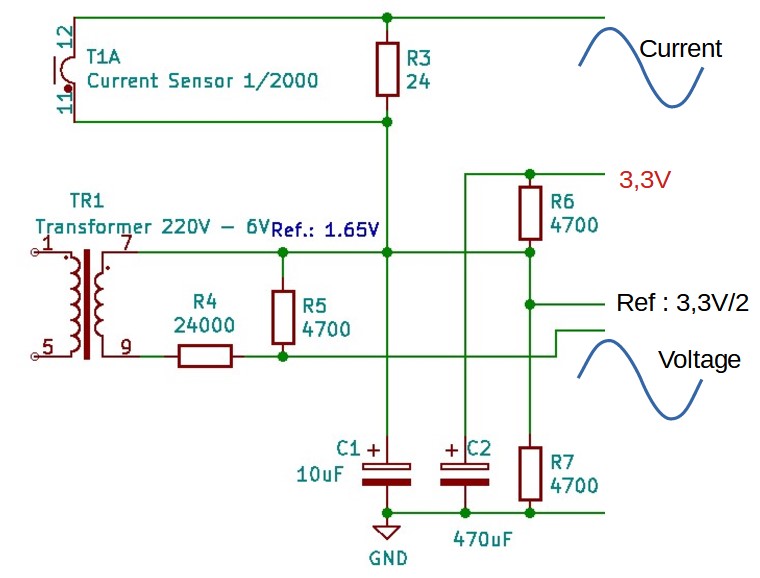
We take the 3.3V from the ESP32 which, passing through a bridge of 2 resistors (R6 and R7) of 4700 ohm connected to ground, provides us with a reference of 1.65V in the middle. To avoid measurement noise, a 470uF capacitor (C2) filters the 3.3V and another 10uF (C1) filters the midpoint at 1.65V.
In order not to exceed 3.3V peak to peak of the signals to be measured, or 1.65V peak, we set a limit of +-1V effective maximum.
For the current probe with 80A and a resistance of 24 ohm, we arrive at approximately 1V.
24*80A/2000=0.96V
At home, with a 12KVA subscription, I should not exceed 60A..
For the voltage measurement, you have to put a bridge of resistors (R4 and R5) to lower the 6V around 1V effective.
Connection to ESP32
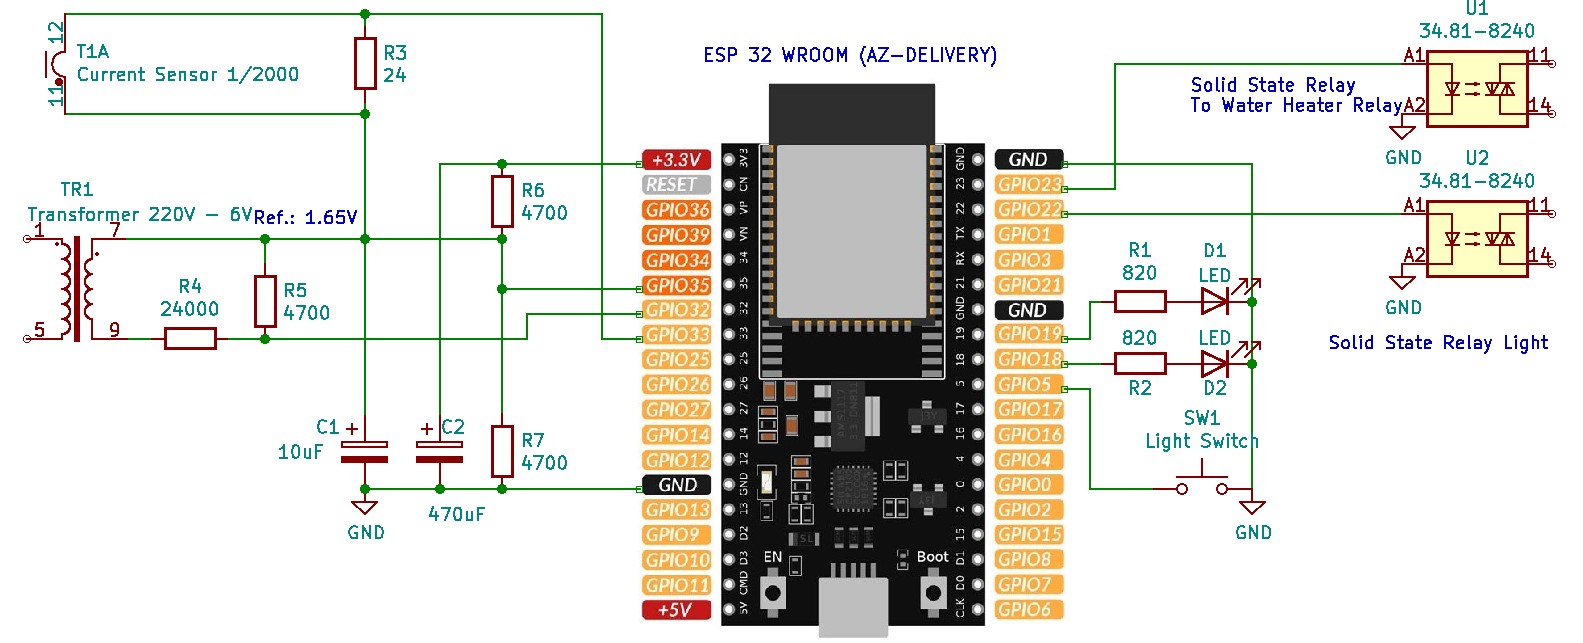
The treasure hunt with these cards that integrate an ESP32, is to find the GPIOs available and not used for Flash programming etc.
In our case, we measure the following voltages:
- GPIO 35: the reference voltage at 1.65V in theory.
- GPIO 33: the voltage representing the current to be measured
- GPIO 32: the output voltage of the transformer
2 LEDs on GPIOs 18 and 19 flash every 2s. The yellow if we consume current, the green if we supply current, because we are in overproduction.
2 solid relays on GPIO 22 and 23 allow:
- to turn on a light in the room controlled by the switch on the GPIO 05,
- energize the water heater start-up power relay in the event of significant electricity production.
Measure
Measuring the 2 values representing voltage and current takes about 120uS. In practice, it is planned over a period of 20ms (1/50Hz) to sample 100 pairs of values, which will give a good description of the a priori sinusoidal voltage and of the current often disrupted by switching power supplies.
To properly time each measurement, we use the microsecond clock of the ESP32.
Every 10 s, we perform:
- the measures of voltages and currents during 20ms
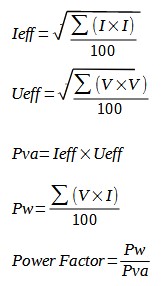
- the calculation of the effective current
- the calculation of the effective voltage
- the calculation of the power in kVA
- the calculation of the power in kW
A prior calibration must be made to define the multiplicative constant kV in the program which allows the conversion of the voltage measured in binary to the real voltage. Likewise for the current, the constant kI . Use a voltmeter, ammeter clamp or your grid counter for calibration.
Code
All code is written using the Arduino IDE. It is initially injected by the serial link, then once in place, it can be modified if necessary by WIFI as described here.
#include <WiFi.h>
#include <ESPmDNS.h>
#include <WiFiUdp.h>
#include <WiFiClient.h>
#include <WebServer.h>
#include <ArduinoOTA.h>
#include <RemoteDebug.h>
const char* ssid = "******";
const char* password = "******";
RemoteDebug Debug;
unsigned long previousComputeMillis;
unsigned long previousClignoteMillis;
unsigned long previousLightMillis;
bool Clignote = false;
bool LightOn =false;
// Set your Static IP address
IPAddress local_IP(192, 168, 0, 208);
// Set your Gateway IP address
IPAddress gateway(192, 168, 0, 254);
IPAddress subnet(255, 255, 255, 0);
IPAddress primaryDNS(8, 8, 8, 8); //optional
IPAddress secondaryDNS(8, 8, 4, 4); //optional
WebServer server(80);
//PINS
const int AnalogIn0 = 35; // GPIO 35
const int AnalogIn1 = 32; // GPIO 32
const int AnalogIn2 = 33; // GPIO 33
const int RelayLight = 22;
const int RelayWaterHeater = 23;
const int LedYellow = 18;
const int LedGreen = 19;
const int Inter = 5;
int value0;
int value1[100];
int value2[100];
int WIFIbug = 0;
float Uef;
float Ief;
float PVA;
float PW;
float PowerFactor;
float kV = 0.2083;
float kI = 0.0642;
float Wh = 0;
//Client of Domoticz
const char* host = "192.168.0.99";
const int httpPort = 8080;
const int idxPower = 1012;
int Nloop = 0;
int day = -1;
// SERVER
//***********
void handleRoot() {
String S;
Debug.println(F("Client Web"));
S = "<body style='background: linear-gradient(#118,#55b,#118);font-size:150%;' onload='setTimeout(\"location.reload();\",2000);'><h2 style='text-align:center;color:white'>Total Power Consumption</h2>";
S += "<div style='text-align:center;width:96%;margin:auto;''>";
S += "<div style='width:400px;margin:auto;'><table align='center' style='border:3px inset grey;padding:4px;background-color:white;font-size:120%;width:100%;'>";
S += "<tr><td>U :</td><td style='text-align: right;'>" + String(Uef) + "</td></tr>";
S += "<tr><td>I :</td><td style='text-align: right;'>" + String(Ief) + "</td></tr>";
S += "<tr><td>P Watt :</td><td style='text-align: right;'>" + String(PW) + "</td></tr>";
S += "<tr><td>P VA :</td><td style='text-align: right;'>" + String(PVA) + "</td></tr>";
S += "<tr><td>Power Factor : </td><td style='text-align: right;'>" + String(PowerFactor) + "</td></tr>";
S += "<tr><td>kWh :</td><td style='text-align: right;'>" + String(Wh / 1000) + "</td></tr>";
S += "<tr><td>Heure :</td><td style='text-align: right;'>" + String(floor(millis()/ 36000)/100) + "</td></tr>";
S += "</table></div>";
S +="<div style='text-align:center;width:1000px;margin:auto;'>";
S += "<div style='text-align:center;'><h3><span style='color:red;'>U_</span><span style='color:lightgreen;'> I_</span></h3>";
S += "<p><svg height='400' width='1000' style='border:3px inset grey;background-color:white;'>";
S += "<line x1='0' y1='400' x2='0' y2='0' style='stroke:rgb(0,0,0);stroke-width:2' />";
S += "<line x1='0' y1='200' x2='1000' y2='200' style='stroke:rgb(0,0,0);stroke-width:2' />";
int Vmax = 1;
int Imax = 1;
for (int i = 0; i < 100; i++) {
Vmax = max(abs(value1[i]), Vmax);
Imax = max(abs(value2[i]), Imax);
Debug.println(value1[i]);
}
S += "<polyline points='";
for (int i = 0; i < 100; i++) {
int Y = 200 - 200 * value1[i] / Vmax;
int X = 10 * i;
S += String(X) + "," + String(Y) + " ";
}
S += "' style='fill:none;stroke:red;stroke-width:6' />";
S += "<polyline points='";
for (int i = 0; i < 100; i++) {
int Y = 200 - 200 * value2[i] / Imax;
int X = 10 * i;
S += String(X) + "," + String(Y) + " ";
}
S += "' style='fill:none;stroke:green;stroke-width:6' />";
S += "</svg></p></div>";
S += "<div style='width:96%;margin:auto;border:3px inset grey;background-color:#666;height:20px;position:relative;'>";
int X = 0;
int Y = 99 - 99 * PW / 12000;
String C="yellow";
if (PW < 0) {
X = 198 - Y;
Y = 0;
C="green";
}
S += "<div style='position:absolute;top:3px;height:14px;background-color:" +C +";left:" + String(X) + "%;right:" + String(Y) + "%;'></div>";
S += "</div>";
S +="</div>";
S +="<div></body>";
server.send(200, "text/html", S );
}
void handleNotFound() {
Debug.println(F("File Not Found"));
String message = "File Not Found\n\n";
message += "URI: ";
message += server.uri();
message += "\nMethod: ";
message += (server.method() == HTTP_GET) ? "GET" : "POST";
message += "\nArguments: ";
message += server.args();
message += "\n";
for (uint8_t i = 0; i < server.args(); i++) {
message += " " + server.argName(i) + ": " + server.arg(i) + "\n";
}
server.send(404, "text/plain", message);
}
// DOMOTICZ client
//****************
void SendToDomoticz() {
String url;
Nloop = (Nloop + 1) % 10;
if (Nloop == 0 || Nloop == 2) {
// Use WiFiClient class to create TCP connections
WiFiClient client;
if (!client.connect(host, httpPort)) {
Serial.println("connection failed");
return;
}
if (Nloop == 2) {
// We now create a URI for the request
url = "/json.htm?type=command¶m=getServerTime"; //Obtain time from Domoticz server
} else {
// We now create a URI for the request
url = "/json.htm?type=command¶m=udevice&idx=";
url += String(idxPower);
url += "&nvalue=0&svalue=";
url += String(PW);
url += ";";
url += String(Wh);
}
// This will send the request to the server
client.print(String("GET ") + url + " HTTP/1.1\r\n" +
"Host: " + host + "\r\n" +
"Connection: close\r\n\r\n");
unsigned long timeout = millis();
while (client.available() == 0) {
if (millis() - timeout > 5000) {
Serial.println(">>> Client Timeout !");
client.stop();
return;
}
}
// Read all the lines of the reply from server and print them to Serial
while (client.available()) {
String line = client.readStringUntil('\r');
// Serial.print(line);
int p = line.indexOf("ServerTime");
if (p > 0) {
String subline = line.substring(p + 14, p + 32);
p = subline.lastIndexOf("-");
subline = subline.substring(p + 1, p + 3); //day after month
// Serial.print(subline);
int theday = subline.toInt();
if (day != theday) {
day = theday;
Wh = 0; // Rest Watt Heure of the day
// Serial.println("Reset Watt Hour");
}
}
}
// Serial.println();
// Serial.println("closing connection");
}
}
// POWER
//********
void MeasurePower() {
int i;
value0 = analogRead(AnalogIn0);
unsigned long MeasureMillis = millis();
unsigned long T= micros();
while (millis() - MeasureMillis < 21) { //Read values during 20ms
i = (micros() % 20000) / 200;
value1[i] = analogRead(AnalogIn1) - value0;
value2[i] = analogRead(AnalogIn2) - value0;
}
}
void ComputePower() {
float V;
float I;
Uef = 0;
Ief = 0;
PW = 0;
for (int i = 0; i < 100; i++) {
V = kV * float(value1[i]);
Uef += sq(V);
I = kI * float(value2[i]);
Ief += sq(I );
PW += V * I;
}
Uef = sqrt(Uef / 100) ;
Ief = sqrt(Ief / 100) ;
PW = floor(PW / 100);
PVA = floor(Uef * Ief);
PowerFactor = floor(100 * PW / PVA) / 100;
Wh += PW / 360; //Every 10s
}
void Overproduction(){
if (PW <-700){ //switch On water heater
digitalWrite(RelayWaterHeater,HIGH);
}
if (PW>1000){ //Switch Off with hyteresis
digitalWrite(RelayWaterHeater,LOW) ;
}
}
// SETUP
//*******
void setup() {
Serial.begin(115200);
Serial.println("Booting");
// Configures static IP address
if (!WiFi.config(local_IP, gateway, subnet, primaryDNS, secondaryDNS)) {
Serial.println("STA Failed to configure");
}
//WiFi.mode(WIFI_STA);
WiFi.begin(ssid, password);
while (WiFi.waitForConnectResult() != WL_CONNECTED) {
Debug.println("Connection Failed! Rebooting...");
delay(5000);
ESP.restart();
}
// init remote debug
Debug.begin("ESP32");
initOTA();
Debug.println("Ready");
Debug.print("IP address: ");
Debug.println(WiFi.localIP());
Serial.print("IP address: ");
server.on("/", handleRoot);
server.on("/inline", []() {
server.send(200, "text/plain", "this works as well");
});
server.onNotFound(handleNotFound);
server.begin();
Debug.println("HTTP server started");
previousComputeMillis = millis();
previousClignoteMillis = millis();
pinMode( RelayLight , OUTPUT);
pinMode( RelayWaterHeater , OUTPUT);
pinMode( LedYellow , OUTPUT);
pinMode( LedGreen , OUTPUT);
pinMode( Inter , INPUT_PULLUP);
digitalWrite(RelayLight, LOW);
digitalWrite(RelayWaterHeater, LOW);
digitalWrite(LedYellow, LOW);
digitalWrite(LedGreen, LOW);
}
// LOOP
//******
void loop() {
ArduinoOTA.handle();
Debug.handle();
server.handleClient();
if (millis() - previousComputeMillis >= 2000) {
previousComputeMillis = millis();
MeasurePower();
ComputePower();
Overproduction();
if (WiFi.waitForConnectResult() != WL_CONNECTED) {
Debug.println("Connection Failed! #" +String(WIFIbug));
WIFIbug ++;
if ( WIFIbug >20) {
ESP.restart();
}
} else {
Debug.println("Connection OK! ");
WIFIbug = 0;
}
SendToDomoticz();
Debug.println("Power:"+String(PW));
}
if (millis() - previousClignoteMillis >= 2000) {
Clignote = !Clignote;
if (Clignote) {
previousClignoteMillis = millis() - 1950;
} else {
previousClignoteMillis = millis();
}
if (PW >= 0) {
digitalWrite(LedYellow, Clignote);
digitalWrite(LedGreen, LOW);
} else {
digitalWrite(LedYellow, LOW);
digitalWrite(LedGreen, Clignote);
}
}
//Light
if (digitalRead(Inter)==LOW && (millis()-previousLightMillis) >500) {
LightOn=!LightOn;
digitalWrite(RelayLight,LightOn);
previousLightMillis=millis();
}
if (millis() - previousLightMillis >= 120000) {
LightOn=false;
digitalWrite(RelayLight,LightOn);
previousLightMillis=millis();
}
}
// OTA
//******
void initOTA() {
// Port defaults to 3232
// ArduinoOTA.setPort(3232);
// Hostname defaults to esp3232-[MAC]
ArduinoOTA.setHostname("ESP32-Power");
// No authentication by default
ArduinoOTA.setPassword("admin");
// Password can be set with it's md5 value as well
// MD5(admin) = 21232f297a57a5a743894a0e4a801fc3
// ArduinoOTA.setPasswordHash("21232f297a57a5a743894a0e4a801fc3");
ArduinoOTA
.onStart([]() {
String type;
if (ArduinoOTA.getCommand() == U_FLASH)
type = "sketch";
else // U_SPIFFS
type = "filesystem";
// NOTE: if updating SPIFFS this would be the place to unmount SPIFFS using SPIFFS.end()
Debug.println("Start updating " + type);
})
.onEnd([]() {
Debug.println("\nEnd");
})
.onProgress([](unsigned int progress, unsigned int total) {
Debug.printf("Progress: %u%%\r", (progress / (total / 100)));
})
.onError([](ota_error_t error) {
Debug.printf("Error[%u]: ", error);
if (error == OTA_AUTH_ERROR) Debug.println("Auth Failed");
else if (error == OTA_BEGIN_ERROR) Debug.println("Begin Failed");
else if (error == OTA_CONNECT_ERROR) Debug.println("Connect Failed");
else if (error == OTA_RECEIVE_ERROR) Debug.println("Receive Failed");
else if (error == OTA_END_ERROR) Debug.println("End Failed");
});
ArduinoOTA.begin();
}
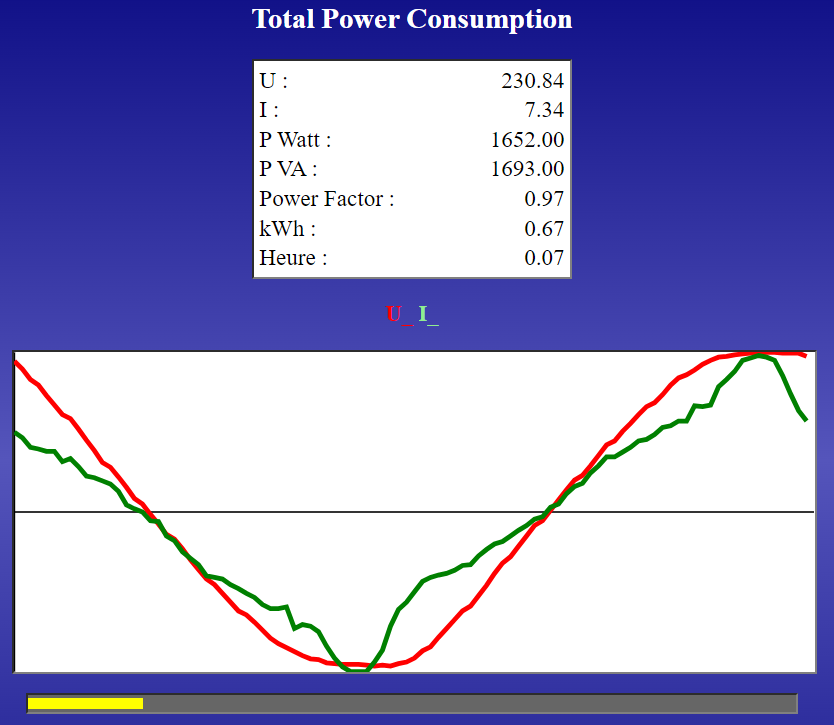
Web Page
The code includes a small web server that displays on one page the various measurements as well as the voltage and current over a period of 20 ms.
Hardware

In an electrician’s box we install :
- The ESP32 card (AZ-Delivery)
- A 5V 1A power supply for the ESP32
- A low voltage transformer to measure the voltage
- 2 solid state relays connected to 3.3V, controlled by the ESP32
- On the front panel as an option, a push button and 2 LEDs
Connected to this box, we have the current probe to be placed around the phase wire of the mains to be measured.
Security
By working on this 230V project, you agree to assume responsibility for your own safety and take all the necessary precautions to avoid electric accidents.
This Post Has 12 Comments
Comments are closed.
Hello Andre.
I want to congratulate you on the poriekt.
I’ve already tested it and it’s OK.
And would it be a big problem for you to add the THD calculation from the voltage amplitude from the input value1 [i] = analogRead (AnalogIn1) – value0; ?
My words of appreciation for the great resource of your knowledge and I would also like to congratulate you on the idea of drawing charts using vector graphics – SVG.
Stanislaw SP9FUT
Stanislaw
Thank you for your remarks. For the THD, it’s an interesting suggestion, but I think it’s difficult to implement an FFT on the ESP32. Maybe another method, like DFT, requiring less processing power?
Stanislaw
I have a new version v2 which provides the THD calculation
https://f1atb.fr/index.php/2022/12/07/diy-solar-energy-router-to-manage-overproduction/
Hello Andre.
Your description of the meter is very helpful.
I did and everything works very well.
But can you tell me if there is a library to calculate the flicker rate so it is measured using voltage change analysis.
Because I can’t find anything, I wanted to add the result of calculations from one hour parametr – flicker Pst and Plt.
Feel you could suggest how to add calculations to the current voltage measurement with the meter.
Stanislaw SP9FUT
I don’t know if libraries exist to compute the voltage flicker.
In version 1, we measure the voltage every 2s, it’s too low. In version 2 it’s a similar software execute every 40ms. These values has to be recorded to make the calculation.
There are a lot of memory still available and processing power too.
Hello Andre.
Thanks for the last reply.
I am trying to write code for ESP32 to calculate flicker coefficient from voltage.
I found a description of the calculations in Polish in the link below.
http://elektroonline.pl/a/5098,Obliczanie-wskaznika-migotania-swiatla,,Technika-swietlna
Maybe this description will be helpful to us, but you need to replace the sensor with the voltage measurement result.
hhttps://projecthub.arduino.cc/Johan_Ha/8c660b94-ae6c-4b1b-b8c9-477facc50262
But my English is poor, I can’t find anything about it.
Maybe together we’ll come up with something to use the voltage measurement to calculate.
You know the principles of measurement better and the computing power and memory in ESP32 will allow you to implement this idea.
Regards.
Stanislaw SP9FUT
https://community.element14.com/challenges-projects/project14/photonics/b/blog/posts/simple-light-flicker-meter
Stanislas
Most of people are not interested fy the flicker coefficient and see no interest to have it in the Solar router.
73
André
Hello Andre.
I wasn’t interested either when I had incandescent bulbs but when I use LED lights now I notice it and sometimes my head hurts.
But now I know what is the cause and I am now trying to use LED bulbs powered from 12 V DC from a stabilized power supply.
But I would like to have this measurement to respect my eyes.
Andre, I will still look for descriptions in this topic and maybe I will find something and maybe I will provide you with information and the procedure code based on your meter code.
Regards
VY 73!!
Stanislaw SP9FUT
This description seems to be the closest to what I am looking for. I think it can be adapted to measure flicker from voltage measurement.
https://www.hackster.io/mircemk/arduino-flicker-meter-determining-the-quality-of-light-bulbs-8011ce#code
Hi.
This does not work at all.
I bought all parts connect them as diagram show.
Speaking of code in version 1.
Can I connect to any port I like?
Because when I read version 2 there is ports assign.
I don’t see any mathematical formula in version.
How does calculate?
Kind regards
For the formula, you can find them from line 222 to line 241
void ComputePower() {
float V;
float I;
Uef = 0;
Ief = 0;
PW = 0;
for (int i = 0; i < 100; i++) { V = kV * float(value1[i]); Uef += sq(V); I = kI * float(value2[i]); Ief += sq(I ); PW += V * I; } Uef = sqrt(Uef / 100) ; Ief = sqrt(Ief / 100) ; PW = floor(PW / 100); PVA = floor(Uef * Ief); PowerFactor = floor(100 * PW / PVA) / 100; Wh += PW / 360; //Every 10s } I don't understand what you mean by port. You have to set the IP adress adapted to your local network at home. The port is by default 80 as any web server. It's not necessary to put it in the fielsd address of your browser. Regards André