Domoticz – IFTTT – Google Home
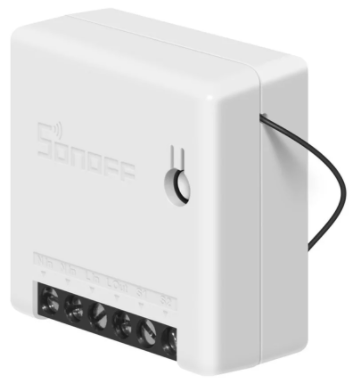
The SonOff mini is a very useful module in home automation. It has many attractive features like:
- a reduced size 42 * 42 * 20mm allowing it to be housed inside wall switch boxes
- a relay for switching from 220v up to 10A
- an input to receive a command like a switch
- a wifi connection allowing remote control
- additional inputs to be soldered to connect temperature sensors, Infra Red (PIR) etc …
- a programmable microcontroller (ESP 8285) to manage the logic of the assembly
- a price of around 5 €
Below you will find different methods of programming and using the SonOff mini.
Programming – eWeLink
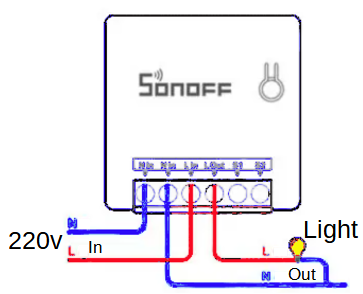
Once out of its box we supply 220v at the input and on the output, we can connect a light. On Google Play (Android) or the App-Store you download the eWelink application to control the SonOff via the home wifi. It’s quick to set up but you go through a “cloud” in China to control your lamp. In the event of an internet cut-off, the system is no longer operational.

You must register on the site and receive a validation code by email.
Programming – SonOff DIY
For those who do not wish to go through a “cloud”, this is understandable, SonOff offers to configure the system to link it to the home automation system which will send HTTP requests by POST. This is the so-called DIY (Do IT Yourself) mode.
Once powered on, press the switch on the box for at least 5s (or even a second time 5s if the system has already been programmed). The blue led flashes quickly, the SonOff switches to Wifi transmission (Access Point “ITEAD …. xxxxx”) connect with a smartphone with the password 12345678. Then enter the name of the local wifi to use (SSID) at the future as well as your wifi password. A SonOff DIY Mode Tool for windows allows you to familiarize yourself with the commands to pass (REST API) to the SonOff to control the relay from a home automation system.

Depending on the home automation system used, tutorials explain the programming.
Programming – ESP Easy
ESP Easy is a free and open source MCU firmware for the Internet of Things (IoT). It works on MCU (microcontroller) platforms based on the ESP8266 or ESP8285 whichever equips the SonOff mini. There is a very simple operating system that allows you to control a relay, read temperature, humidity,PIR sensors, etc. The time management allows you to adapt the treatments according to the time, the date etc … The set is remotely reprogrammable and controllable from a smartphone, a home automation system or even by voice with Google Home or Alexa. This is my favorite solution for the many capabilities it offers. We no longer use the original SonOff firmware and we will install the ESP EASY firmware instead.
SonOff Mini Hardware
Open the SonOff to access the different “GPIO” pins.
| GPIO0 | Switch | ESP Programming |
| GPIO1 | TX | |
| GPIO2 | ||
| GPIO3 | RX | |
| GPIO4 | Input on front connector | |
| GPIO12 | Relais | 1=”On” 0=”Off” |
| GPIO13 | LED bleue | O=”Off” 1=”On” |
| GPIO16 | OTA pin |
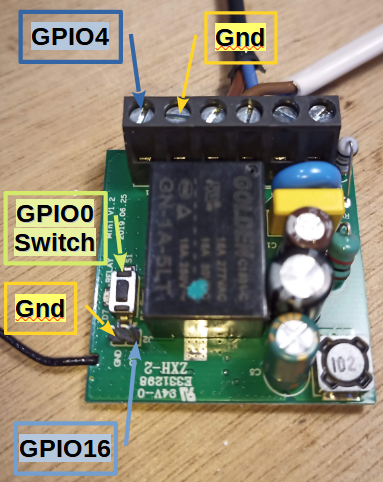
Upper part with:
-2 220v power supply terminals
-2 terminals for the 220v output of the relay
- 2 terminals (Ground and GPIO4) for a low voltage input or output
- a GPIO16 pin (OTA *)
- a mass pine
- a push switch connected to GPIO0
* The OTA function no longer seems to be used.
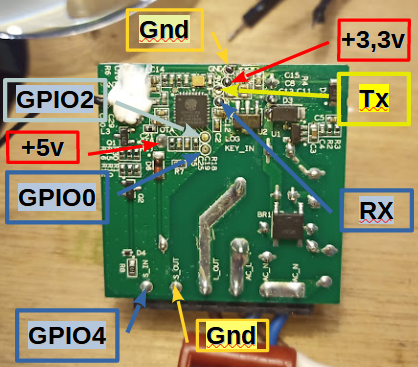
Lower part offering the possibility of connecting to different GPIOs by soldering a wire. This operation is delicate and may put off some. But follow my advice to make your job easier.
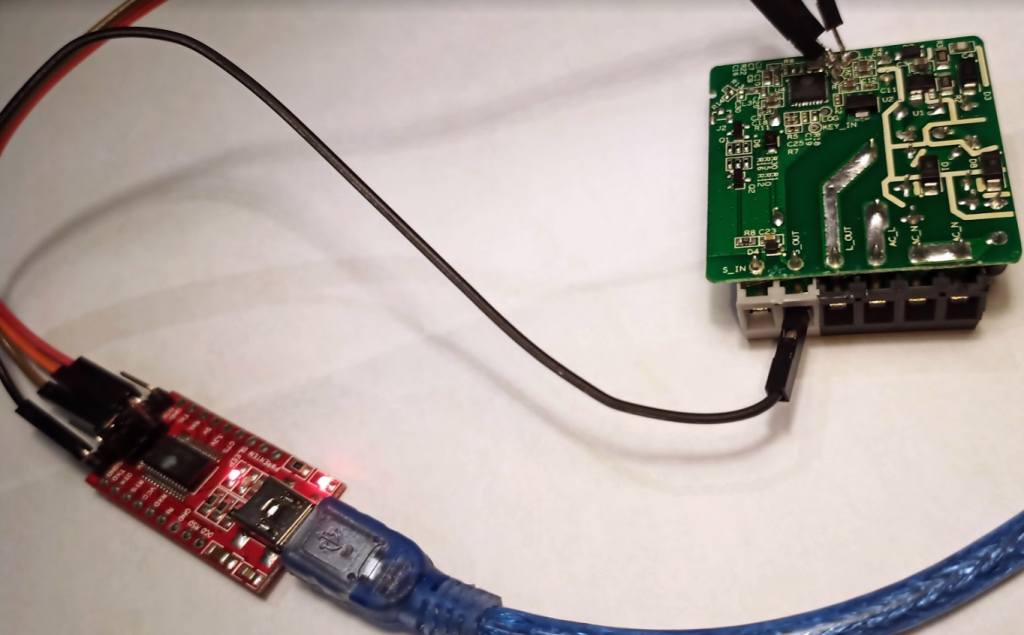
Cablage programmateur
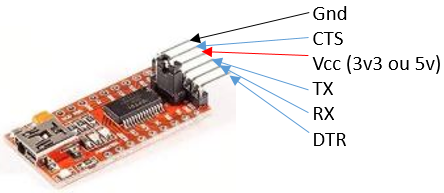
At the back of the printed circuit we will solder 4 wires to program it with a USB TTL adapter that can be found for 6 € at Amazon, Ebay … Put the selector on 3v3 which will power the SonOff during programming and not the 220v for safety.
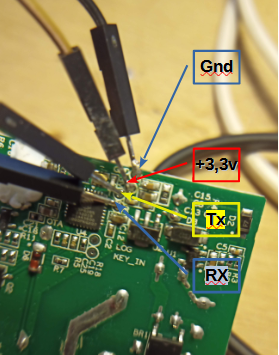
To solder the 4 cables, fix the SonOff on a support with a clamp for example. Take wires with male Dupont plugs. They facilitate welding with the rigid tip that can be heated and the plastic casing that avoids burning your fingers.
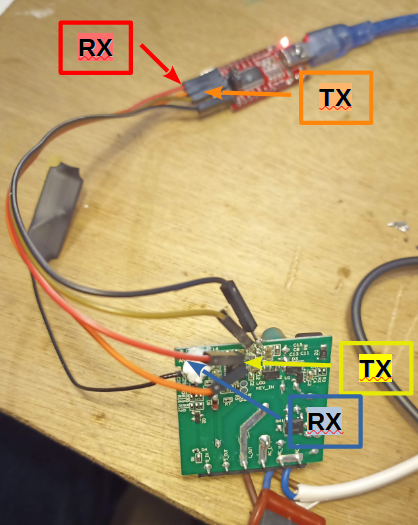
Please note that the TX output of SonOff must be connected to the RX input of the USB / TTL adapter. The RX input of SonOff connects to the TX of the adapter.
ESP EASY FIRMWARE PROGRAMMING
Go to Github to download the latest version of ESP Easy.
https://github.com/letscontrolit/ESPEasy/releases
Extract the .zip and go to the bin folder to look for the normal version for ESP8285. Make a copy in the folder where the FlashESP8266.exe “flash” program is located. The same program can be used for ESP8285 and ESP8266.

Launch the “FlashESP8266” program, select the serial port on which windows has attached the USB port of the adapter. If the adapter is not visible, install a driver in windows for USB / FTDI.
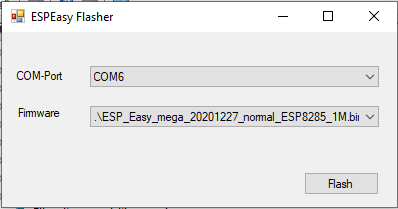
To switch SonOff (ESP) to programming mode, keep the push button pressed when switching on by plugging in the USB cable. Then you start the programming which will take about a minute.
WIFI PROGRAMMING
Restart the SonOff by cutting and re-feeding it either through the 3v3 or directly from the 220v input (by being disconnected from the adapter). At this moment the ESP does not know which WiFi network to connect to, it will switch to WiFi access point mode and emit its own signal. Open your phone or a PC with Wifi and search for a network called ESP…., Connect to this network. If a password is requested it is “configesp”. A web page will open and you will see the list of wifi networks around you. Select your wifi and give your wifi password. The ESP will enter your WiFi in its settings and switch to it to continue programming. This operation is delicate and often it has to be done several times. To limit the setbacks, do this operation near the box that emits the wifi signal so that it is strong and not too disturbed by the neighborhood. When switching to your WiFi network, locate the IP address that your box will have assigned by DHCP to the ESP. For information, the initial connection operation to the ESP wifi signal is usually done at the IP address: 192.168.4.1. It can help in some cases.
If you are powering the SonOff from the USB / TTL adapter, use a serial terminal program (ex Arduino monitor) programmed at 115200 baud. It will display the log of actions in progress on the ESP in real time.
To configure and program the SonOff, details are given on this post https://f1atb.fr/remote-power-supply-control-with-sonoff/ which deals with very similar SonOff basic.
On the ESP Easy site https://www.letscontrolit.com/wiki/index.php/ESPEasy a rich documentation explains the operation and programming.
Examples of use
DIRECT ACCESS THROUGH THE WEB
Without special programming, the relay connected to the GPIO12 can be activated directly
- relay On
http://<espeasyip>/control?cmd=GPIO,12,1
- relay Off
http://<espeasyip>/control?cmd=GPIO,12,0
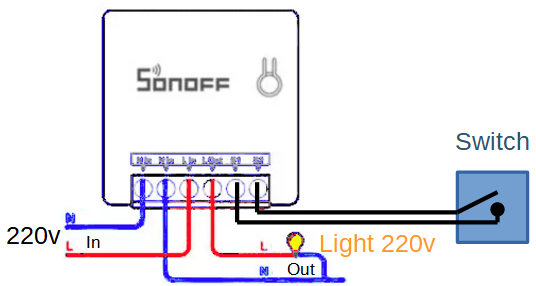
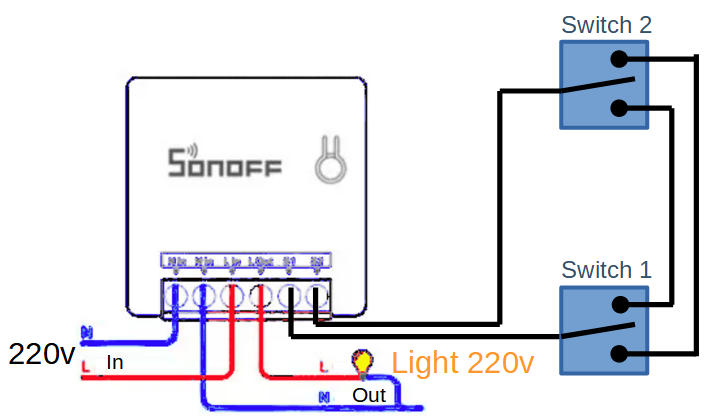
USE OF A SWITCH
In addition to a web command, for example, you can put a switch which will change the state of the relay at each changeover.
Create 2 switch type devices in “Devices”.
- Switch input , Name:”relais” and values “etat”on GPIO12
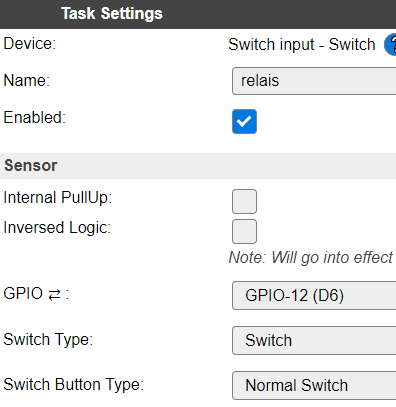
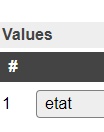
- switch input, Name:”inter” and values “etat” on GPIO4
In “tools / Advanced” activate the use of “Rules” programming rules. This will allow you to write a small script.
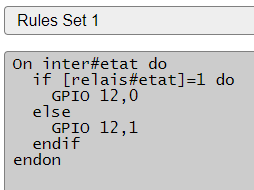
Each time the switch state changes, the relay will change state. Via WIFI, you can always force the relay to On or Off.
In a domestic installation, a two-way switch system can be replaced with 2 switches by installing a SonOff which will take over the 2 existing switches. The link being in low voltage 3.3v, one can use telephone cable to connect the switches between them.
CONTROL BY DOMOTICZ
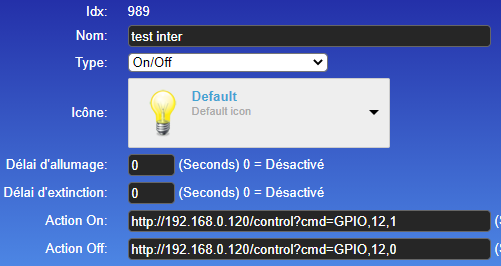
If you want to control the SonOff by a central home automation system like Dommoticz, you have to create a “Dummy, Switch” and take the 2 commands over the web.
IFTTT – Google Home – ALEXA
If you want the SonOff to respond to a voice command passed to a speaker connected to Google Home or Alexa, it is easy to go through the IFTTT (If This Then That) service which will take care of the transfer of the command.
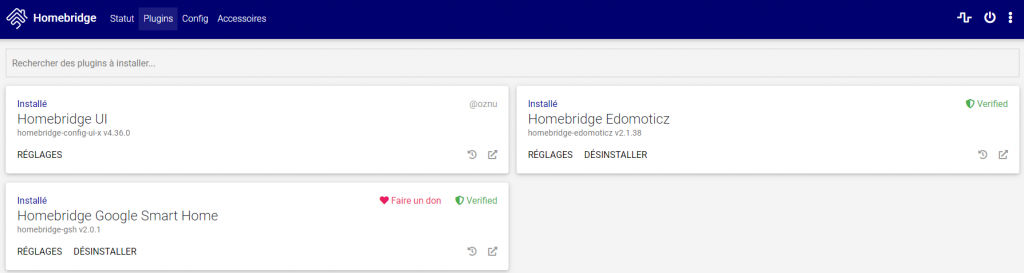
Homebridge – Google Home – ALEXA
IFTT is an easy solution to set up but now at the end of 2020 this service has become chargeable beyond 3 managed devices. To get around this difficulty, you can use the “Homebridge” gateway. You have to install a Homebridge server and the Google Smart Home or Alexa plugin on a machine like a raspberry. You can use the same machine as Domoticz. Tutorials on the web explain how to install the set. Personally, I use it with the Edomoticz plugin which allows me to control my many switches managed by Domoticz via my Google speakers.
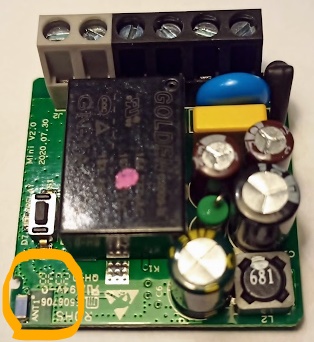
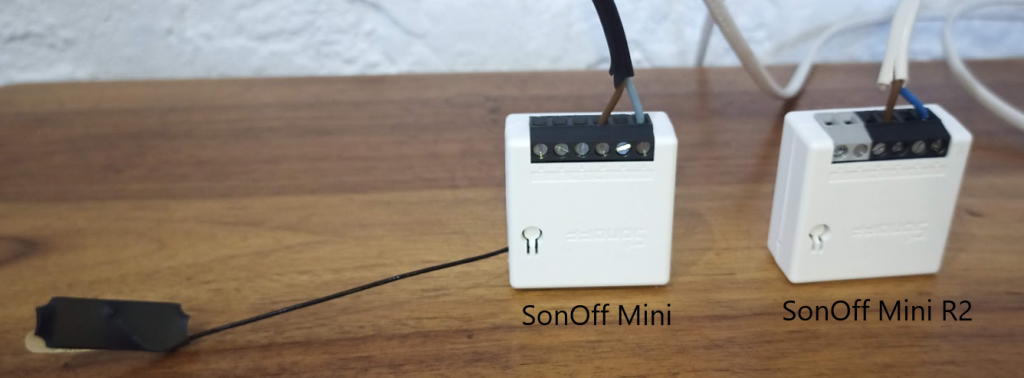
SonOff Mini R2
Now in 2021 a new version called SonOff Mini R2 is on the market. Unfortunately, it loses 2 interesting features.
- the GPIO16 access pin
- the external WIFI antenna
GPIO16
Removing this pin no longer allows a simple connection of a temperature or presence sensor. You need to solder a wire to another GPIO if the input GPIO4 is already taken.
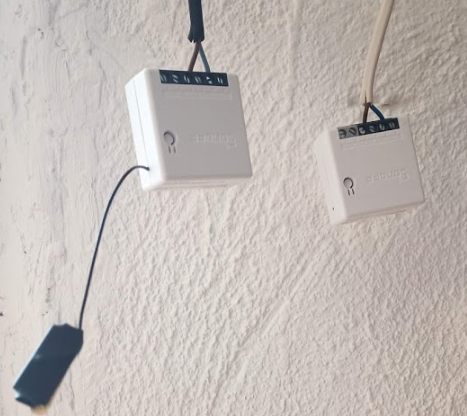
WIFI Antenna
The external wifi antenna was a plus because it guaranteed better reception in the case of a long distance from the Wifi access point. A comparison of the 2 models equipped with the EspEasy firmware showed a drop in RF signal from -3dB to -10dB.
Case one with 3dB difference


Case two with 7db difference


This new version seems to have been developed for security reasons. No finger hanging around the GPIO16 when the 220v is present. No WIFI antenna that could come into electrical contact with a 220v wire.
Great job, thanks.
I have already programmed so many Sonoffs, but this tutorial will by my reference if I am again forgetting something.
Thank you for the encouragement to publish other articles on home automation.
nice tutorial!
GND on switch connector is what i did’t thought of xD
can we use a pad on the mini r2 to connect a PIR / digital in?
Is there a different procedure to enter flash mode in minir2? I mean the usb cable procedure. I have flashed a bunch V1 minis but I cant make it work on V2.
For me it’s the same procedure.
F1ATB
Can I add an external antenna? Where to connect it?
If you use the model with the internal antenna, it’s difficul to to add an external one as you have to remove the connection to the internal one.
Would it be possible to power a Sonoff Mini via usb to the 5v Pad you indicated? Looking for a convenient way to tasmotize a relay for a low voltage (about 12v) application.
Yes, I think you can. The consumption should be below 500ma which is the limit on USB.
Pingback: Sonoff Mini R2 - Elektrologi
Hi! Is there any way to put an external antenna on the sonoff mini? I’ve seen this procedure with other models (eg 4Ch), but the sonoff mini’s PCB is very different. thanks.
I don’t know and be careful with the 220v isolation.