The “Web Audio API” provides a powerful and flexible system for controlling audio data on a web page. It makes it possible in particular to select audio sources (microphone, media stream), to process them with filtering or other, before playing them locally or sending them over the Internet.
The processing can be broken down into elementary processing known as “Audio Node”, interconnected with one another. The “Web Audio API” has a library of Audio Nodes, such as high pass filtering, low pass filter etc. But here we will be interested in the case where we want to create our own processing on the Audio data. This type of Node is called an AudioWorklet.

Microphone authorization
Before any test, it is necessary to get rid of the fact that web browsers do not provide access to the microphone if the site does not have secure access in https or on localhost. On your local network at home, you generally work in http simply. To get around this difficulty, the solution is to set up a derogation at the level of the web browser by accessing the “flags” parameters. You must type in the address bar:
with Chrome: chrome://flags
with Edge(2021): edge://flags
Look for:
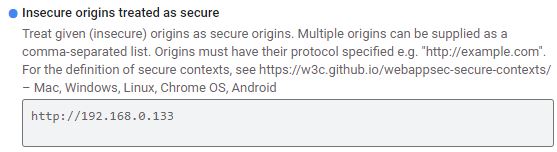
Insecure origins treated as secure
Fill in the field as below with the IP address of your server providing the pages.
Audio Worklet
The Audio Worklet replaces the obsolete ScripProcessor Node. It breaks down into 2:
- the audio worklet node which interconnects with the other processing nodes like any other node of the “Web Audio API”
- the audio worklet processor which processes the audio samples with its own program in Javascript. It is described in a separate file in the form of a module that we load. It will be executed in a ‘thread’ parallel to the main ‘thread’, which brings interest in execution time and latency.

In the example below, we will take the signal from the microphone, send it only to the left speaker. On the one on the right, we are going to send a sine wave, the level of which we will vary.
Selection of microphone source
To select the microphone, web browsers impose 2 constraints.
- Be on a secure https site or have an exemption as described above.
- Click on a button once the web page is displayed
var MyAudio={Ctx:null,mic_stream:null,RightGain:0,node:null};
// Microphone Selection
function  Start(){
	MyAudio.Ctx = new AudioContext({sampleRate:10000}); //Force 10kHz as sampling rate for the microphone
	if (!navigator.getUserMedia)
        navigator.getUserMedia = navigator.getUserMedia || navigator.webkitGetUserMedia ||
    navigator.mozGetUserMedia || navigator.msGetUserMedia;

    if (navigator.getUserMedia){
		//By default, connection to the microphone
        navigator.getUserMedia({audio:true},
				function(stream) {
					start_microphone(stream);
				},
				function(e) {
					alert('Error capturing audio.May be no microphone connected');
				}
            );

    } else {
		alert('getUserMedia not supported in this browser or access to a non secure server(not https)');
	}
}
First, you have to create an Audio context that brings together all the characteristics of the channel. We take the opportunity to reduce the sampling to 10kHz. This is sufficient for a microphone which processes voice up to about 3kHz.
MyAudio.Ctx = new AudioContext({sampleRate:10000})If all goes well by clicking on the button that launches the Start () function, the microphone input is chosen and we create a flow called stream. that we pass to the asynchronous start_microphone (stream) function.
AudioWorklet Node
The microphone input node, MyAudio.mic_stream, is created.
async function start_microphone(stream){

		//Microphone stream
		MyAudio.mic_stream = MyAudio.Ctx.createMediaStreamSource(stream);
		await MyAudio.Ctx.audioWorklet.addModule('MyWorklet.js?t=22') //Separate file containing the code of the AudioWorkletProcessor
		MyAudio.node = new AudioWorkletNode(MyAudio.Ctx, 'MyWorkletProcessor'); //Link to MyWorkletProcessor defined in file MyWorklet.js
		MyAudio.node.port.onmessage  = event => {

            if (event.data.MaxMicLevel) { //Message received from the AudioWorkletProcessor called 'MyWorkletProcessor'
                let MaxMicLevel = event.data.MaxMicLevel;
				let NbSample =  event.data.NbSample
				let SampleRate  = event.data.SampleRate
				console.log("Microphone",MaxMicLevel,NbSample,SampleRate);
            }
        }
		Vol_Level( 0.5)
		MyAudio.mic_stream.connect(MyAudio.node).connect(MyAudio.Ctx.destination) // Stream connected to the node then to the speakers

}
We indicate where the processing module is located.
await MyAudio.Ctx.audioWorklet.addModule (‘MyWorklet.js? t = 22’)
It is a javascript file located in the same folder as the main web page. The complement? T = 22, only serves to force browsers to reload the page each time. This is practical in the development phase so that each modification made to the file is taken into account and not the cached page. You can put anything that looks like a parameter there. Remember to add the path of the folder if the set is not in the same.
Then we create the node:
MyAudio.node = new AudioWorkletNode (MyAudio.Ctx, ‘MyWorkletProcessor’);
We indicate to it the name of the class which contains the process to be executed. Here ‘MyWorkletProcessor’.
Our audio signal processing can return messages to the main page. This creates an event:
MyAudio.node.port.onmessage = event => {…}
It is possible to send messages to set parameters. Here it will be the audio level of the sine wave on the right speaker.
function Vol_Level(V){
	MyAudio.RightGain=V;
	MyAudio.node.port.postMessage({volumeRight :MyAudio.RightGain } ) //Message sent to the AudioWorkletProcessor called 'MyWorkletProcessor'
}
We interconnect all the nodes between them.
MyAudio.mic_stream.connect(MyAudio.node).connect(MyAudio.Ctx.destination) The microphone input node, connects to the MyAudio.node node that we created, which connects to the default output node called MyAudio.Ctx. destination.
Audio Worklet Processor
We construct the class ‘MyWorkletProcessor’
class  MyWorkletProcessor  extends AudioWorkletProcessor {
  constructor () {
    super();
	this.volumeRight =0;
	this.port.onmessage = (e) => {
			this.volumeRight = e.data.volumeRight
			console.log("Volume Right",this.volumeRight);
		}
  }
  process (inputs, outputs, parameters) {
    const input = inputs[0];
    const output = outputs[0];
	var MaxMicLevel=0;
        for (var channel = 0; channel < input.length; ++channel) {
            var inputChannel = input[channel]
            var outputChannel = output[channel]
			if(channel ==0){
				for (var i = 0; i < inputChannel.length; ++i) {
				   outputChannel[i] = inputChannel[i];
				   MaxMicLevel=Math.max(MaxMicLevel,Math.abs(outputChannel[i]));
				}
			}
			if(channel ==1){
				for (var i = 0; i < inputChannel.length; ++i) {
				   outputChannel[i] =this.volumeRight*Math.sin(Phase++);
				}
			}
        }

       this.port.postMessage({MaxMicLevel: MaxMicLevel,NbSample:inputChannel.length, SampleRate: sampleRate });

    return true;
  }
};

registerProcessor('MyWorkletProcessor',MyWorkletProcessor);
We define the parameters that will serve us. Here is the audio level of the sinusoid that we will receive from the worklet node.
this.volumeRight …
We describe the signal processing which is characterized by inputs and outputs:
process (inputs, outputs, parameters) {..}.
There can be several ‘inputs’. Here, with classic audio cards, we are interested in the first only inputs [0]. This 2-way ‘channel’ input to be able to process stereo if necessary.
On channel 0, the left channel, we copy at the output outputChannel [i], all the samples received (128) on inputChannel [i]. In passing, we measure the maximum amplitude that we will send, by message, to the node of the main thread.
On channel 1, we do not use the input, but we send a sine ‘Math.sin (Phase ++)’ by rotating the phase at each sample. The level is modulated by the cursor defined on the main page.
At the end, we declare and record this treatment:
registerProcessor(‘MyWorkletProcessor’,MyWorkletProcessor);
By running this project, and looking at the output on the browser console, we will notice 2 important points:
- audio samples are processed in packs of 128
- the dynamics of the signals is between +1 and -1. Never go beyond with the ‘Web Audio API’.
Source code of the web page
Below is the html / javascript code of the main page to put in a file, for example, ‘Worklet_demo.html’. It contains the creation of the node worklet.
<html>
<head>
<title>AudioWorklet Example - F1ATB 2021</title>
</head>
<body>
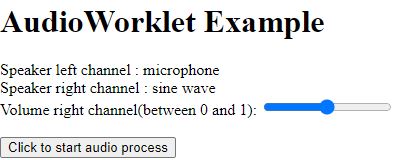
<h1>AudioWorklet Example</h1>
<div> Speaker left channel : microphone</div>
<div> Speaker right channel : sine wave</div>
<div>
<label for="vol">Volume right channel(between 0 and 1):</label>
<input type="range" id="vol" name="vol" min="0" max="1" step="0.01" onmousemove=" Vol_Level( this.value);">
</div>
<br>
<button onclick="Start();">Click to start audio process</button>
<script type="text/javascript" charset="utf-8">
var MyAudio={Ctx:null,mic_stream:null,RightGain:0,node:null};
// Microphone Selection
function Start(){
MyAudio.Ctx = new AudioContext({sampleRate:10000}); //Force 10kHz as sampling rate for the microphone
if (!navigator.getUserMedia)
navigator.getUserMedia = navigator.getUserMedia || navigator.webkitGetUserMedia ||
navigator.mozGetUserMedia || navigator.msGetUserMedia;
if (navigator.getUserMedia){
//By default, connection to the microphone
navigator.getUserMedia({audio:true},
function(stream) {
start_microphone(stream);
},
function(e) {
alert('Error capturing audio.May be no microphone connected');
}
);
} else {
alert('getUserMedia not supported in this browser or access to a non secure server(not https)');
}
}
async function start_microphone(stream){
//Microphone stream
MyAudio.mic_stream = MyAudio.Ctx.createMediaStreamSource(stream);
await MyAudio.Ctx.audioWorklet.addModule('MyWorklet.js?t=22') //Separate file containing the code of the AudioWorkletProcessor
MyAudio.node = new AudioWorkletNode(MyAudio.Ctx, 'MyWorkletProcessor'); //Link to MyWorkletProcessor defined in file MyWorklet.js
MyAudio.node.port.onmessage = event => {
if (event.data.MaxMicLevel) { //Message received from the AudioWorkletProcessor called 'MyWorkletProcessor'
let MaxMicLevel = event.data.MaxMicLevel;
let NbSample = event.data.NbSample
let SampleRate = event.data.SampleRate
console.log("Microphone",MaxMicLevel,NbSample,SampleRate);
}
}
Vol_Level( 0.5)
MyAudio.mic_stream.connect(MyAudio.node).connect(MyAudio.Ctx.destination) // Stream connected to the node then to the speakers
}
function Vol_Level(V){
MyAudio.RightGain=V;
MyAudio.node.port.postMessage({volumeRight :MyAudio.RightGain } ) //Message sent to the AudioWorkletProcessor called 'MyWorkletProcessor'
}
</script>
</body>
</html>Source code of the Worklet Processor
Below, the javascript module to put in the ‘MyWorklet.js’ file and in the same folder as the main page.
var Phase=0;
//"MyWorkletProcessor" is the name of the AudioWorkletProcessor defined below
class  MyWorkletProcessor  extends AudioWorkletProcessor {
  constructor () {
    super();
	this.volumeRight =0;
	this.port.onmessage = (e) => {
			this.volumeRight = e.data.volumeRight
			console.log("Volume Right",this.volumeRight);
		}
  }
  process (inputs, outputs, parameters) {
    const input = inputs[0];
    const output = outputs[0];
	var MaxMicLevel=0;
        for (var channel = 0; channel < input.length; ++channel) {
            var inputChannel = input[channel]
            var outputChannel = output[channel]
			if(channel ==0){
				for (var i = 0; i < inputChannel.length; ++i) {
				   outputChannel[i] = inputChannel[i];
				   MaxMicLevel=Math.max(MaxMicLevel,Math.abs(outputChannel[i]));
				}
			}
			if(channel ==1){
				for (var i = 0; i < inputChannel.length; ++i) {
				   outputChannel[i] =this.volumeRight*Math.sin(Phase++);
				}
			}
        }

       this.port.postMessage({MaxMicLevel: MaxMicLevel,NbSample:inputChannel.length, SampleRate: sampleRate });

    return true;
  }
};

registerProcessor('MyWorkletProcessor',MyWorkletProcessor);
Execution
Put the whole thing on a web server and launch in a modern browser like Chrome or Edge, the main .html file.
On Line Demo
You can access it on this server:
https://f1atb.fr/mes_pages/Worklet/Worklet_demo.html
and test the processing.
This Post Has 4 Comments
Comments are closed.
Great work ! is this going to lead to be able ti use FT8 or digtal modes with remote SDR ?
In the next release 4.2, I will replace the ScriptProcessorNode which is deprecated by the AudioWorkelt. Next steps are to develop digital modes in RemoteSDR.
Sounds very promissing many thanks for all you works so far do you have an Paypal account ?
Thank you Frans
My paypal account is f1atb.fr@gmail.com
73