Remote SDR V1 – Setup
V1 Obsolete. See a more recent setup in the documentation to the right.
“Remote SDR” is a web application for remotely controlling an amateur radio transceiver between 1 MHz and 6 GHZ. Its first application was the duplex control of a station allowing links to the geostationary satellite QO-100 / Es’Hail 2.
The set is made up of:
- a reception chain: SDR (Software Design Radio) + an Orange PI nano processor
- a transmitter channel: SDR + an Orange PI nano processor
- a PC or a tablet controlling the whole with “Remote SDR” running on a web browser like Chrome or Edge.
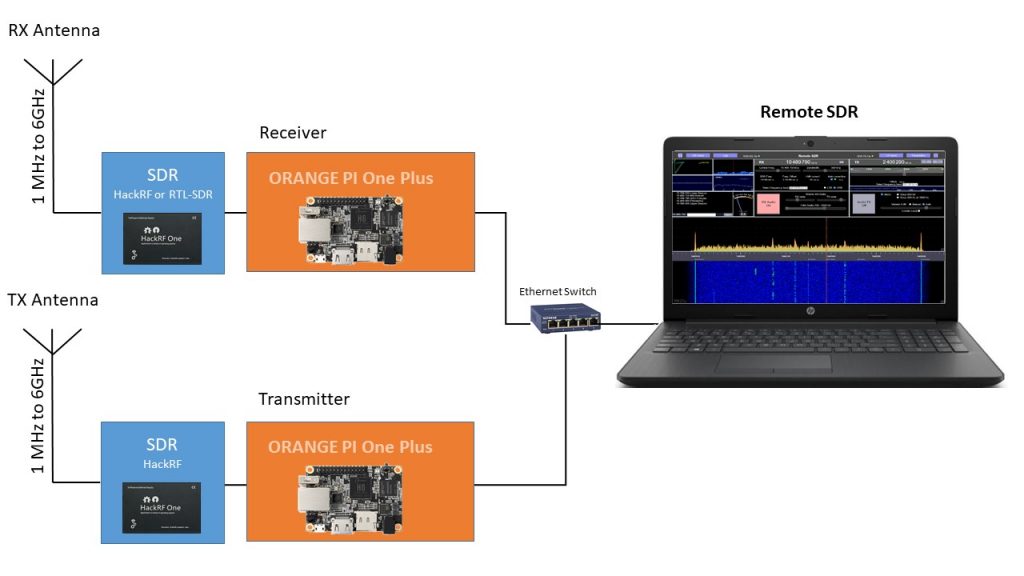
All the files constituting the application can be downloaded from Github F1ATB / Remote-SDR. It is a folder called “RemSDR” to put on the desktop of the user “sdr” of the Orange PI One Plus.
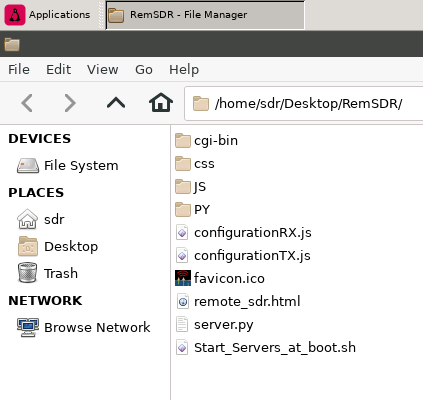
The 2 Orange Pi One Plus receive the same “RemSDR” folder. You can, if you wish, install this same folder on another server to launch the Remote SDR application.
Files and Folders
In order of importance, below are some explanations on the contents of “RemSDR”.
server.py
Program in python 3 which provides the basic functionality of a web server http: //
remote_sdr.html
The web page to load from your PC, MAC or smartphone, to control the transmitter / receiver assembly. You can load this page from the orange pi of the receiver, transmitter or other server where you have installed the files.
The address is normally:
http: // IP_Orange_PI_address: 8000 / remote_sdr.html
Basically, the server listens to port 8000.
configurationRX.js
This is the file in which you define in javascript the frequency bands on which you want to work with your receiver. As an example, there is a configuration for the Oscar 100 / Es’Hail 2 satellite. Also other bands like 2m to do local testing. To be edited with an editor such as “Notepad ++” to adapt the receiver to its hardware configuration.
configurationTX.js
It is the javascript file which configures the transmission bands.
PY
In this folder are the python programs. and the sources of the gnuradio-companion files of the receiver (remote_RX_SSB_v1.grc) and of the transmitter (remote_TX_SSB_v1.grc) before their compilation in python 2 to be executed.
remote_rx_audio.py, remote_rx_para.py and remote_rx_spectre.py allow the python 3 interface between the receiver encoded with gnuradio, remote_rx_ssb_v1.py and the web client as described here.
remote_tx_audio.py and remote_tx_para.py allow the python 3 interface between the transmitter encoded with gnuradio, remote_tx_ssb_v1.py and the web client as described here.
Test_Pin... used to test the output on a pin of the GPIO of an oscillator signal. This is a feature used for the security of the transmitter. The program is different for an Orange Pi One Plus H6 or an Orange PI PC2 H5.
JS
This folder contains the jquery and jquery-ui javascript libraries. Remote_sdr.js corresponds to the main part of the javascript dealing with Remote-SDR and the end of the signal processing of the receiver. Remote_TX.js processes in javascript the start of the transmitter processing chain.
CSS
This folder contains the style sheets allowing the layout of remote_sdr.html. At this level, you can change the layout and color of the elements that make up the web page.
CGI-bin
This folder contains 2 important scripts allowing to launch in python 2 the signal processing of the receiver, remote_rx_ssb_v1.py or of the transmitter, remote_tx_ssb_v1.py. These scripts in perl, start_sdr_rx_ssb.pl and start_sdr_tx_ssb.pl, are called by the remote_sdr.html web page which starts on the one hand the reception processing on the dedicated Orange PI and on the other side the transmission processing on the orange PI on the transmitter side. It is not possible to launch these processing applications when the Oranges PI is powered on because during the boot phase, we cannot connect to the USB port to which the SDR is connected. Don’t forget to have these files executable.
When remote_sdr.html calls the perl script, a system command is executed to launch the python 2 processing applications on the Orange Pi. To have access to the USB port, you must give access privileges to the NOBODY user by removing the password request. This is the object of the python_web file which is copied into the /etc/sudoers.d folder at boot time. To find out more, ask Google for ‘sudo visudo’.
Start_Servers_at_boot.sh
This file is the script which groups together all the commands to be executed during the Orange PI boot phase. It contains:
- redirection of all error messages to a temporary file /tmp/Start_servers.log
- launching the web server: server.py
- the launch of the 3 applications (remote_rx ….) in python3 interfacing the processing of the signal from the receiver to the web client
- the launch of the 2 applications (remote_tx ….) in python3 interfacing the signal processing from the transmitter to the web client
- the copy in /etc/sudoers.d of the python_web file giving the nopasswd privilege to Nobody.
This script, which is identical to the 2 Orange PIs, launches the interface applications required for the receiver and the transmitter. At this stage we do not know which one will work in reception and which in transmission. This is not a problem because these applications are not very resource intensive.
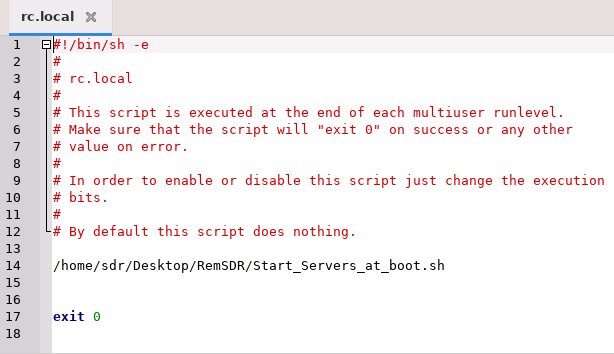
To start the script when the Orange PI is powered on, we add a command line to the /etc/rc.local file which gives its location.
$ sudo nano /etc/rc.local
/home/sdr/Desktop/RemSDR/Start_Servers_at_boot.sh
Other Installations
To install the Remote SDR application on Orange PIs, you need to prepare their environments.
ARMBIAN
For the Armbian operating system, go to the Armbian website and download the version corresponding to the Orange Pi One Plus.
In the following post you will find the installation procedure for an Orange PI One Plus.
GNU RADIO – RTL-SDR – Hack RF
GNU Radio 3.7 and its graphic editor GnuRadio-Companion must be installed, as well as the drivers allowing you to connect an SDR such as RTL-SDR or Hack RF. The following post details the procedure.
Websockets installation
For python 3, you must add the websockets library which allows exchanges with the web browser. First we install the pip installer.
sudo apt install python3-pip
Then we install setuptools:
sudo apt-get install python3-setuptools
Finally we install websockets:
sudo pip3 install websockets
Installation from a Remote SDR Image
The easiest way to avoid the hassle of a complicated installation is to burn an image to a 32 GB micro SD card of the entire system. In no time you will have an operational Remote SDR.
You can find the image on Github.
Posts on Remote-SDR
- Remote SDR V5 -Raspberry 4B or Orange Pi Image Installation
- Remote SDR v5 – Manual Installation
- Remote SDR v5
- QO-100 Satellite Live
- RTTY
- Troubleshooting
- QO-100 Transceiver
- SSTV
- WSJT-X – FT8
- Omnirig – Remote SDR
- Communication Ports
- Tone generators
- Setting of GPIO outputs
- Band Scanning
- Gains and Dynamics
- Frequencies Management
- Launch of Remote SDR
- CPU Cooling
- Web GUI
- Microphone and signal processing authorization
- Configurations
- Characteristics
- Introduction to Remote SDR
- Remote SDR – Audio Channels
- CW with Remote SDR
- Rotary Knob and Morse Manipulator for Remote SDR
- VHF and UHF NBFM Transceiver
- Remote SDR v4
- Gpredict — Remote SDR
- Remote SDR V4 – Raspberry Pi 4B or Orange Pi Zero 2 image installation
- Remote SDR v4 – Manual Installation
- SA818 – RTL-SDR
- Remote SDR – Examples of realization
- Transmit over QO-100 satellite with a Smartphone
- Remote SDR V2 – Software Architecture
- Remote SDR V1- Purchase
- Remote SDR V1 – Man Machine Interface
- Remote SDR V1 – Signal Processing
- Web Client to GNU Radio
- GNU Radio to Web client
- Remote SSB Transmitter
- Remote SSB Receiver
- GPIO on Orange PI One Plus H6
- TCXO installation on HackRF
- Q0-100 Transceiver with 2 SDR – Remote SDR V1




Recent Comments